Help
Video Tutorials
Watch these short video tutorials on how to use the cloud service or click on one of the above tabs for further details.
How to record a video conference
How to stream and record a video conference
How to record with connected camera as source
How to stream and record with connected camera as source
How to record from any RTMP(S) source
How to live stream a video conference on YouTube
How to manage, share, trim and delete videos
- Record with Video conference as Source
- Record with Connected camera as Source
- Record with Skype for Business as Source
- Record with RTMP(S) as Source
Record with Video conference as Source
Before Recording
Do the following before starting to record:
- Set Source to Video conference
- Set Stream to Off

Starting the Recording
The recording can be started in one of the following ways:
- You can call from your video conference endpoint, client or virtual meeting room to your address listed at the top of the Cloud user interface (next to Logout).
- You can call from the Cloud user interface to your video conference endpoint, client or virtual meeting room by (see screenshot below):
- Entering the video address (SIP URI or IP address)
- Entering PIN code (if required by the e.g. virtual meeting room)
- Clicking on the red RECORD button

The Cloud service will connect to your endpoint, client or virtual meeting room as another participant and a black screen with a red blinking dot will transmitted from the Cloud service to the remote side (indicating that the meeting is being recorded or streamed).
During the Recording
When the call has successfully been established between the Cloud service and your endpoint, client or virtual meeting room, a Recording Session Window will appear in the Cloud user interface with details such as recording time, bandwidth and audio/video packet loss.

Stopping the Recording
To stop the recording, you can either click on the red stop button in the Recording Session Window or disconnect the Cloud service as participant on the remote side.
The recorded video will automatically appear in your Video Library.
Record with Connected camera as Source
Before Recording
Do the following:
- Set Source to Connected camera (to use your integrated or USB connected camera)
- Set Stream to Off
- You may make changes to the following settings available below the red RECORD button
- Bandwidth
- Audio source
- Video source
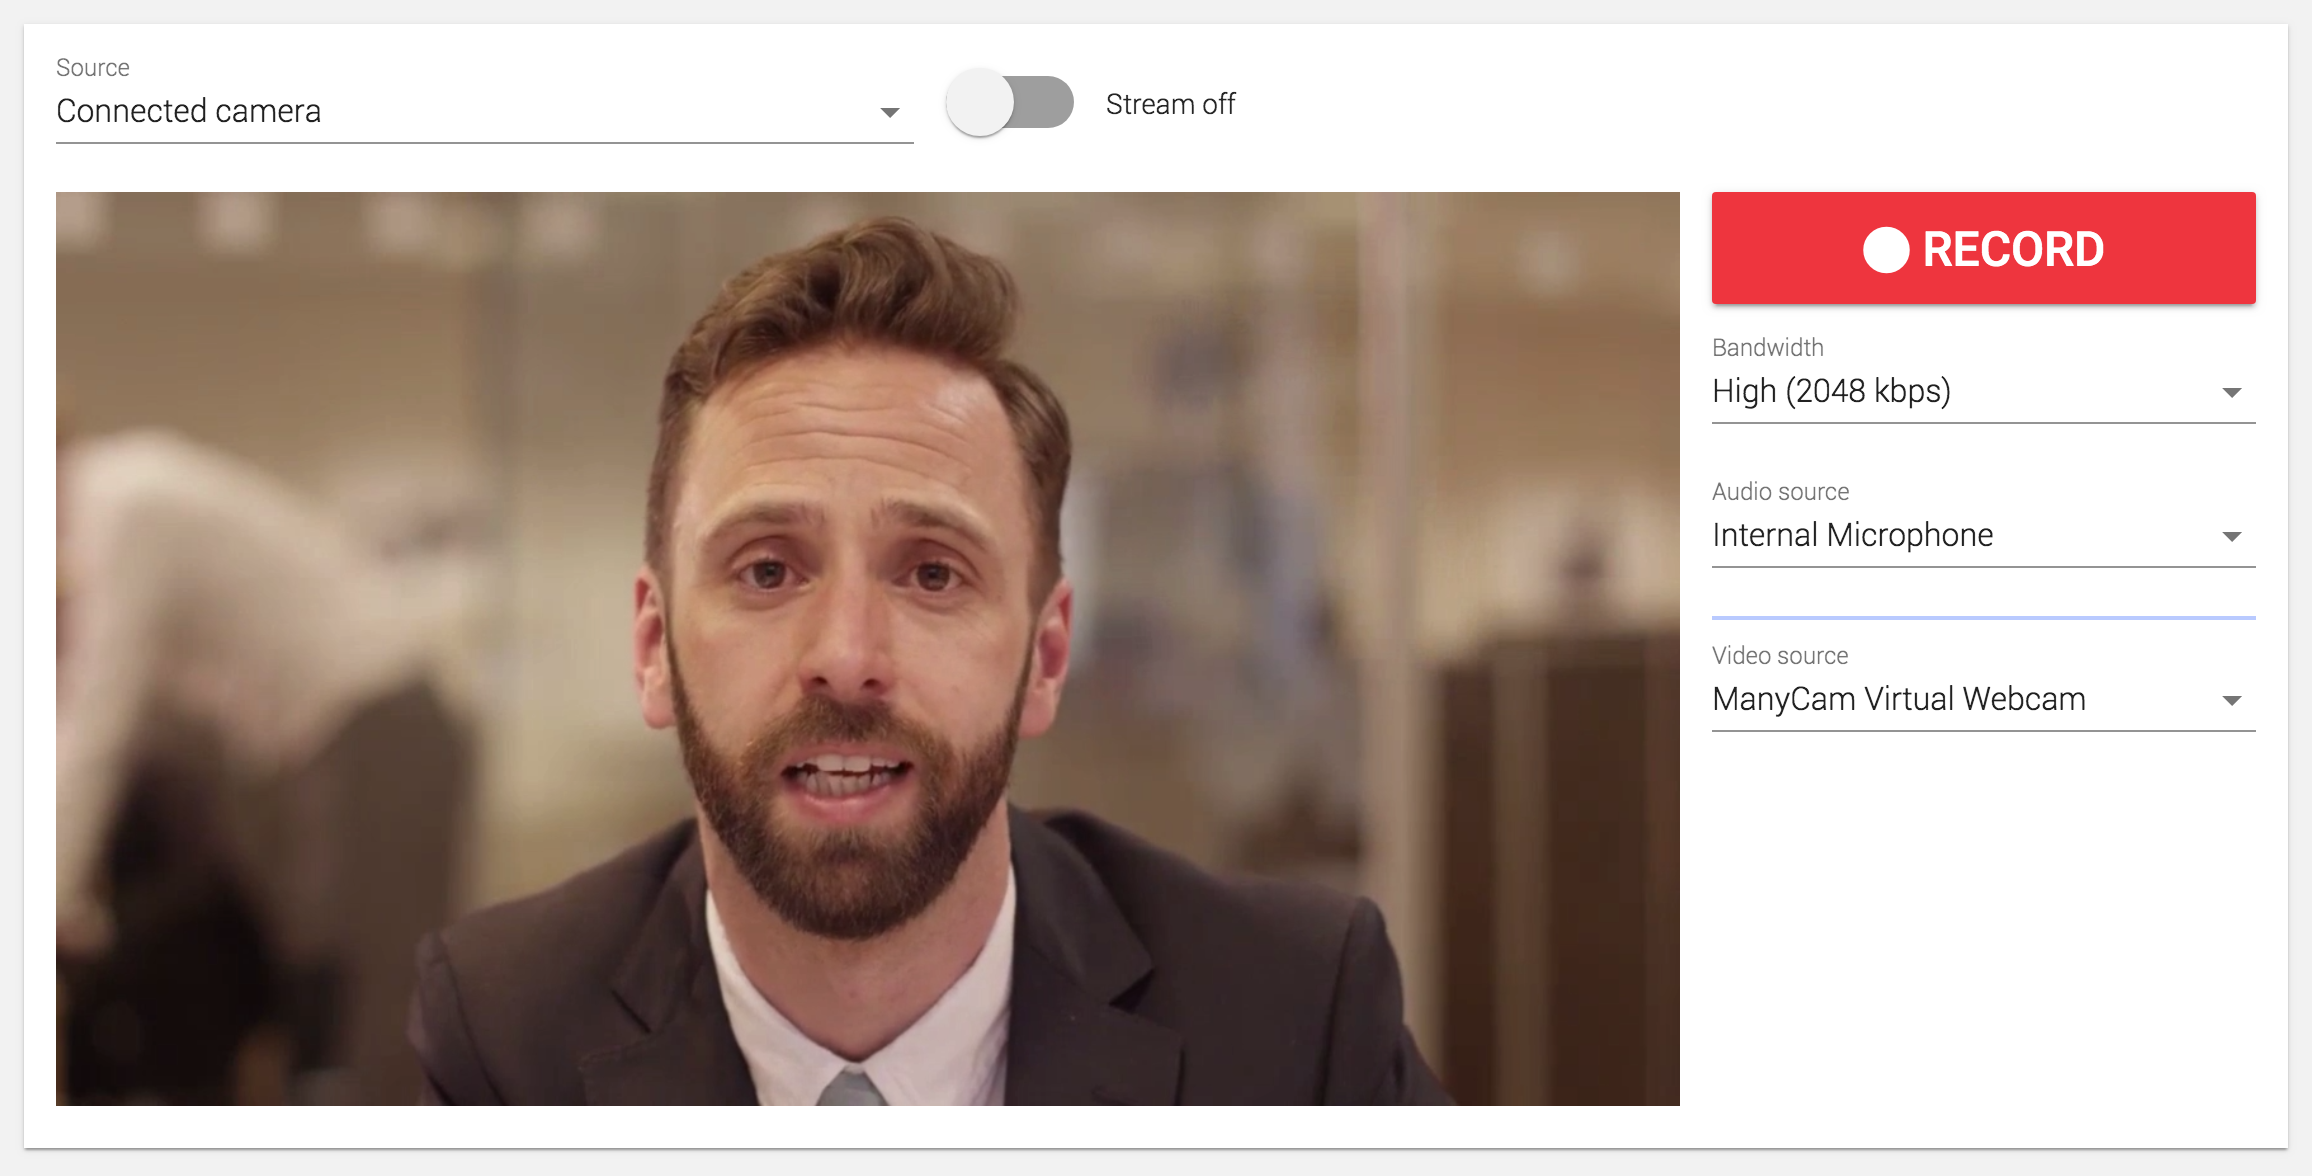
Starting the Recording
Click on the red RECORD button whenever you are ready to start recording.
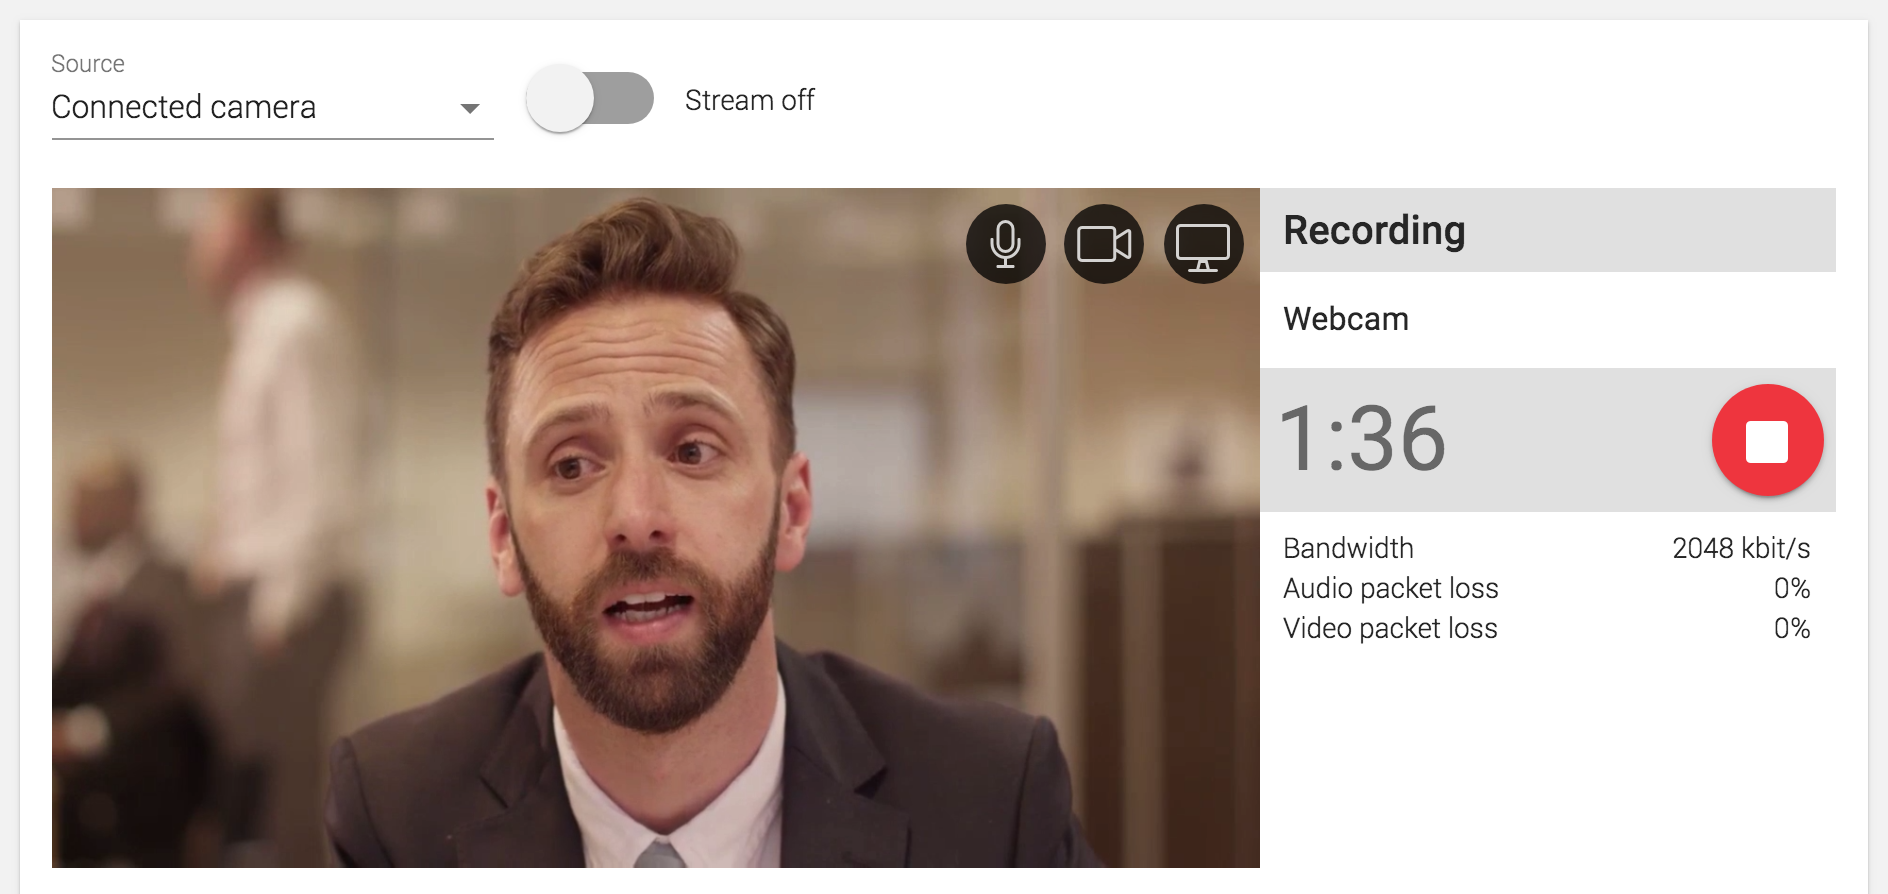
During the Recording
When the recording has successfully started a Recording Session Window with Preview Video will appear in the Cloud user interface with details such as recording time, bandwidth and audio/video packet loss. Placed on top right-hand corner of the Preview Video you have the following buttons which you can use during the recording:
- Mute/un-mute audio
- Disable/enable video
- Share screen (will replace the video source whenever active)
Stopping the Recording
To stop the recording, you can simply click on the red stop button in the Recording Session Window.
The recorded video will automatically appear in your Video Library.
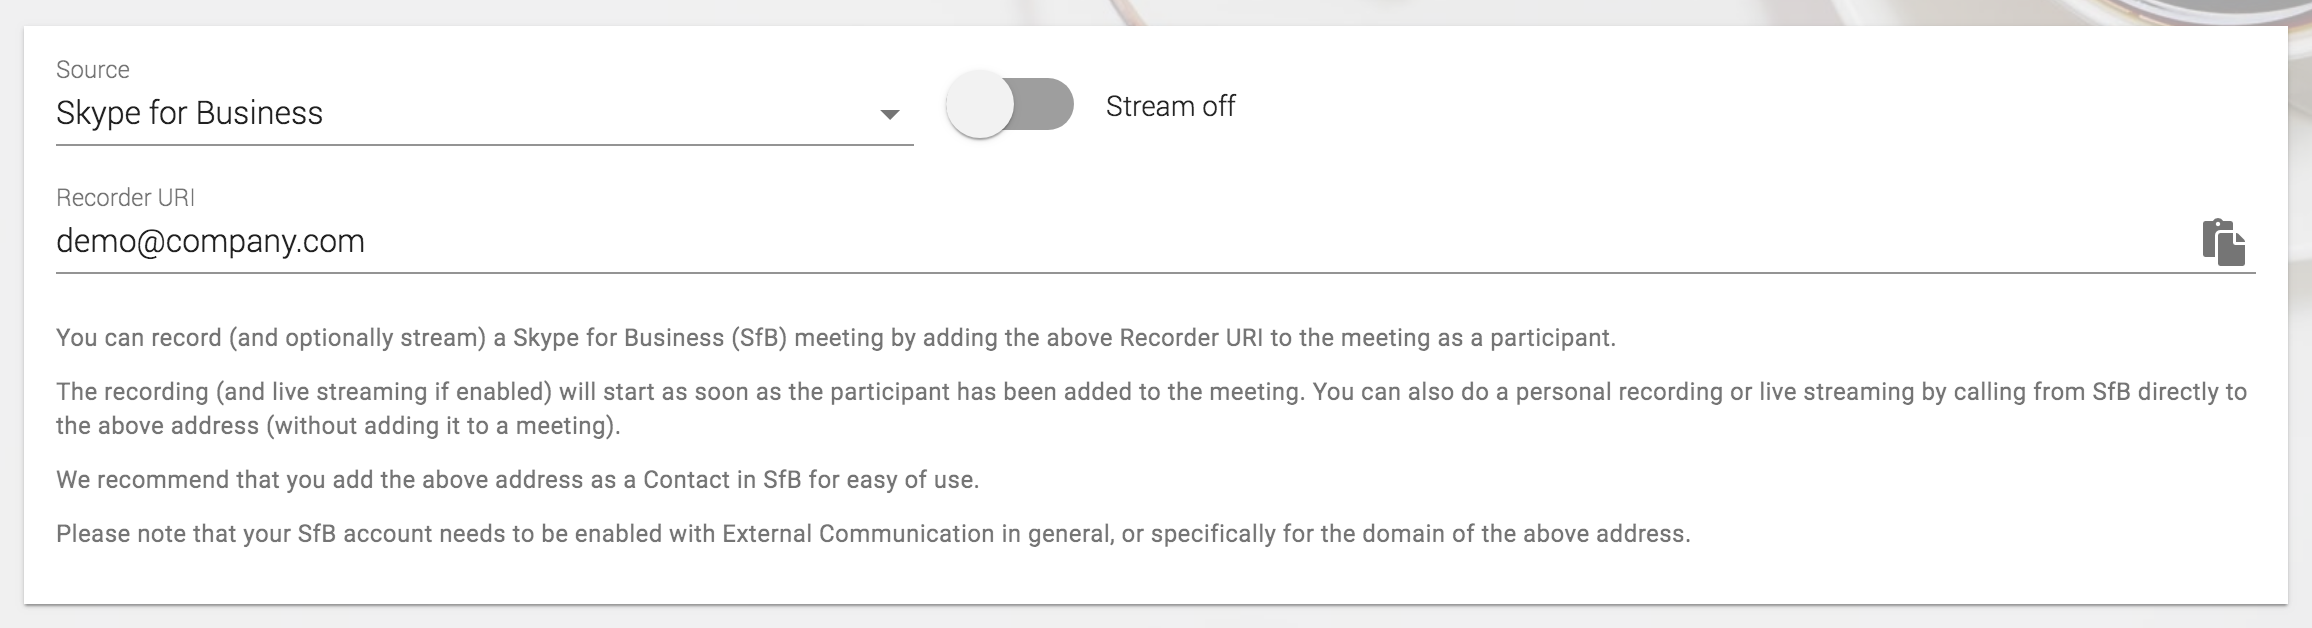
Record with Skype for Business as Source
This feature is not available to all customers. In case the Source dropdown does not list Skype for Business, the feature is not available to your organization.
Before Recording
The first time you want to stream & record from Skype for Business (SfB) create a new Contact in your SfB client with the video address listed at the top of the Cloud user interface (next to Logout).
Before you start recording make sure that Mode is set to Record-only in the Cloud user interface.
Note:
- Changing the Source does not really matter as Skype for Business (SfB) streaming & recording can only be initiated from the SfB client side and that the recording will start regardless of selected Source whenever the Cloud service receives a call from the SfB side.
- Your SfB account needs to be enabled with External Communication in general, or specifically for the Cloud service domain
Starting the Recording
You can start a recording from the SfB client in one of the following ways:
- Place a direct video call to:
- Your address listed at the top of the Cloud user interface (next to Logout),
- or the SfB Contact if you have already added this for your address
- Drag & drop the SfB Contact into an ongoing SfB call
The recording will start and as soon as the call has been established between SfB and the Cloud service. This is confirmed by the black screen with a red blinking dot transmitted from the Cloud service side to the SfB meeting.
During the Recording
When the call has successfully been established between the SfB side and the Cloud service, a Recording Session Window will appear in the Cloud user interface with details such as recording time, bandwidth and audio/video packet loss.

Stopping the Recording
To stop the recording, you can either click on the red stop button in the Recording Session Window or disconnect the Cloud service as participant on the remote side.
The recorded video will automatically appear in your Video Library.
Record with RTMP(S) as Source
Recording with RMTP(S) is supported by activating an RTMP(S) feed from the remote side (software, service or appliance supporting RTMP(S)) to the unique RTMP(S) URL of your account. To obtain the RMTP URL(S), set Source to RTMP(S) and select "Use a secure connection (TLS/SSL)" for RTMPS (instead of unencrypted RTMP):

The following session window appears as soon as the cloud service receives the RMTP(S) feed from the remote side:

The RTMP recording stops when the remote side is no longer sending the RTMP feed. The recorded video will automatically appear in your Video Library.
The cloud service supports receiving and recording multiple RTMP sessions at the same time. Each session will result in a recording. The cloud service captures in the quality sent from the remote side, e.g. 720, 1080p or 4K.
While your subscription includes recording and storage of videos in 720p quality we welcome that you also record and store videos in higher qualities. We reserve the right to introduce limitations and/or introduce subscription tiers based on video quality in the future.
- Creating a new Stream
- Edit, Delete and Share an existing Stream
- Stream & Record with Video conference as Source
- Stream & Record with Connected camera as Source
- Stream & Record with Skype for Business as Source
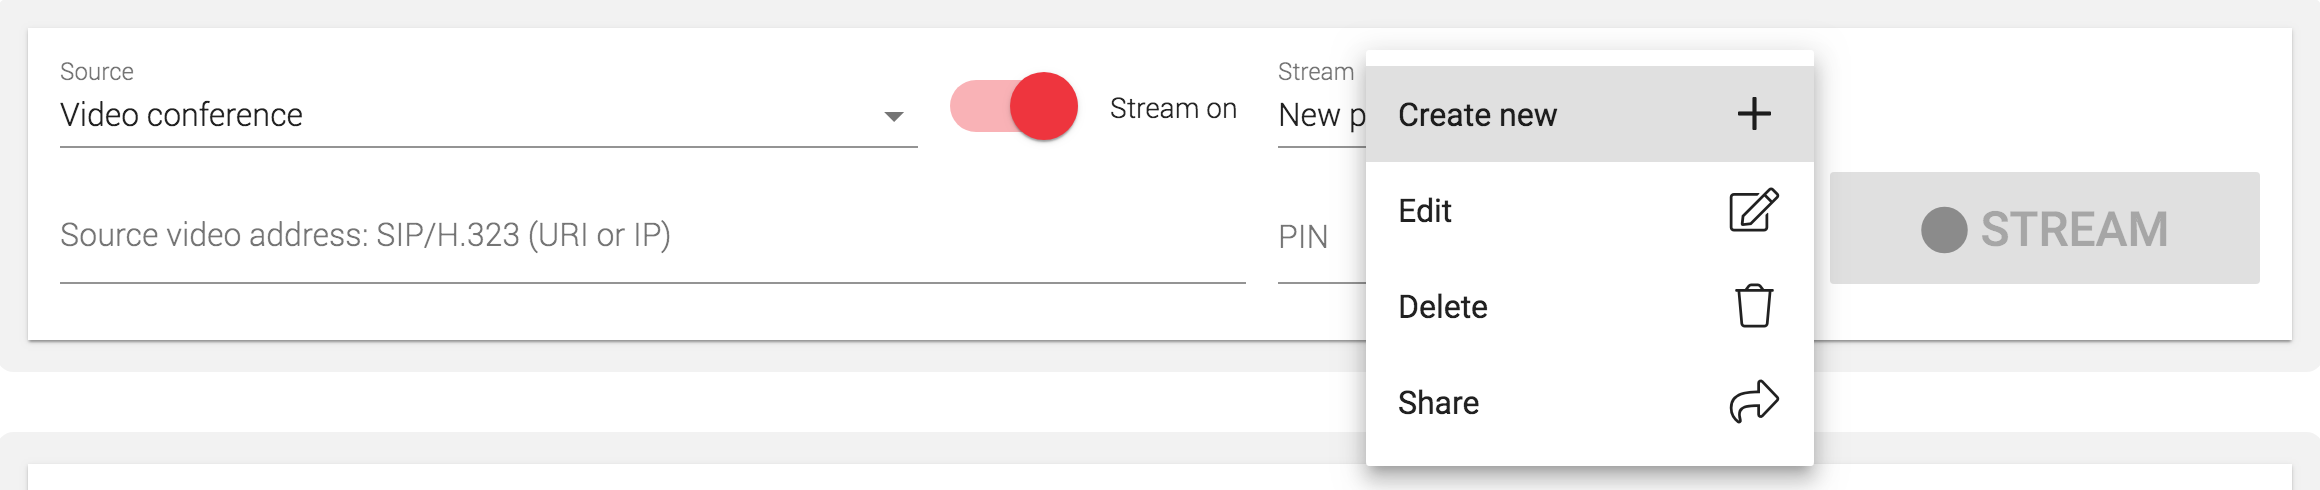
Creating a new Stream
When preparing for a future live stream event (X days/weeks before the event) you need to create a new Stream (unless you plan to use one of your previously created Streams).
To create a new Stream set Stream to on and select Stream action menu next to the Stream dropdown menu:

From the Stream action menu select Create new:
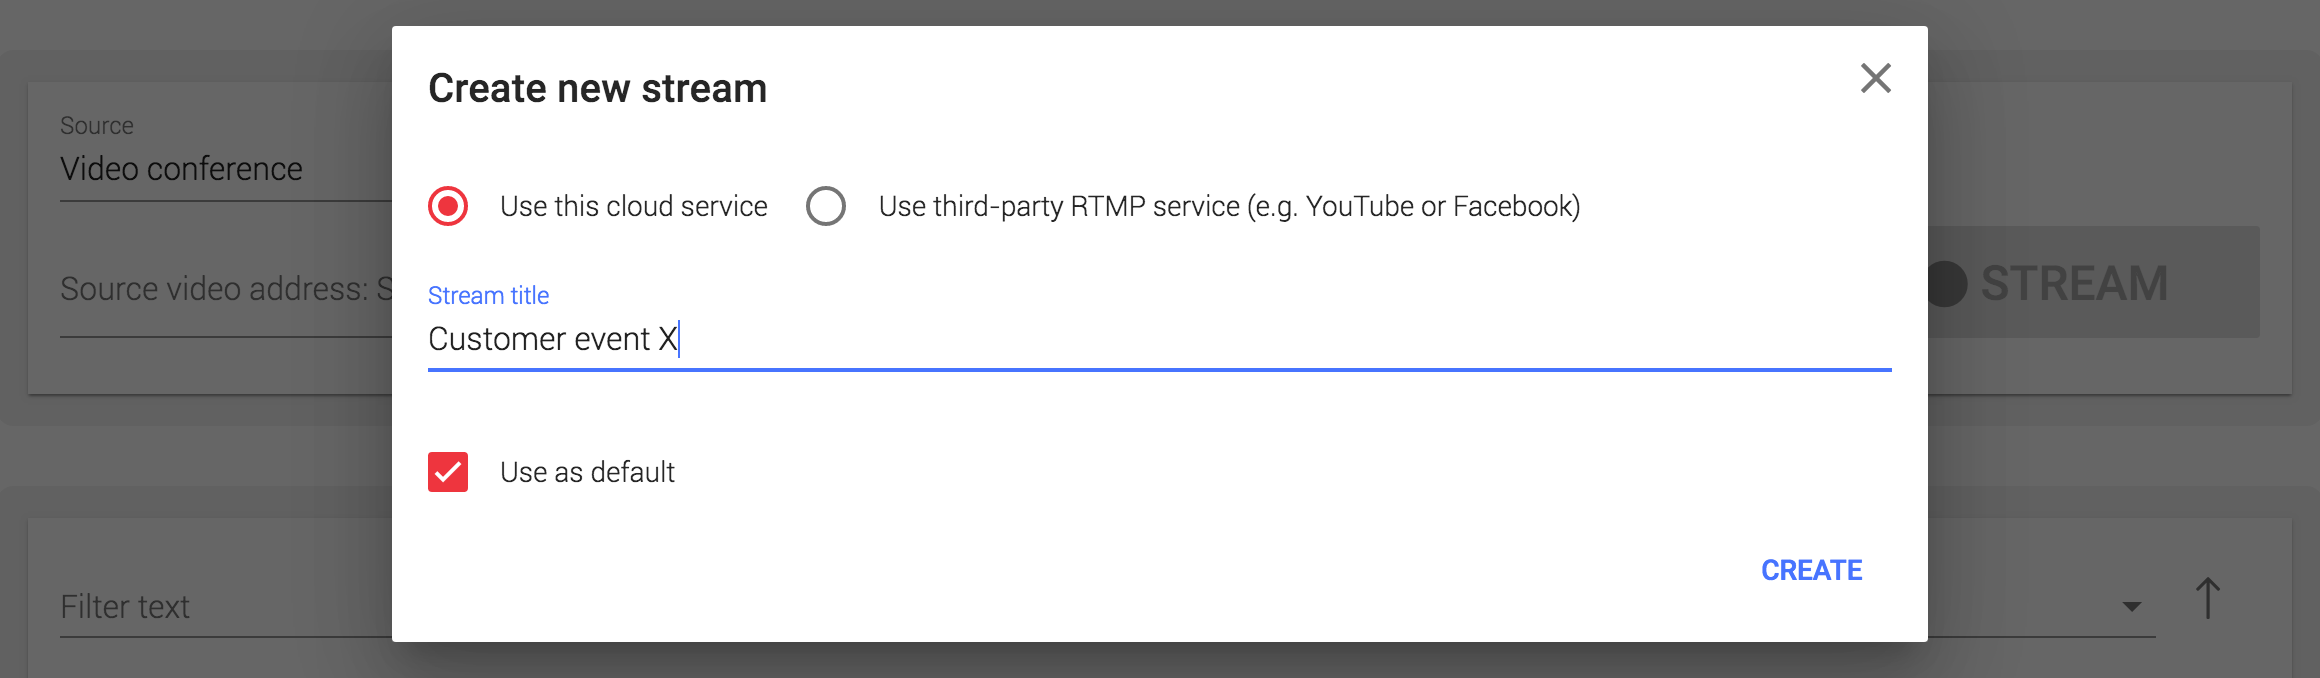
In the Add new stream pop-up you choose between the following two options:
- Option 1: Use this cloud service
- Option 2: Use third-party RTMP service (e.g. YouTube or Facebook)
The following fields are also available in the pop-up
- Stream title: This will be shown in the Stream dropdown menu in the Cloud user interface and for live stream viewers when when this cloud service is used.
- Use as default: By checking this option you select that the new Stream is the target for the streaming & recording session (this can later be changed by selecting a new Stream from the dropdown in the Cloud user interface).
Option 1: Use this cloud service
Select "Use this cloud service" when you want to create, share and stream to a link with this cloud service (no third-party RTMP service).
The next step is to obtain the live stream link(s) for the event:
- By default the cloud service generates provides a unique public link https://<site>/live/<stream-id> where <stream-id> is an auto-generated unique stream identifier consisting of 16 case-sensitive alphanumeric characters.
- The above public link can be combined with an optional password protected link (you enter Link password and then click on GENERATE LINK button)
The link may be shared with the audience by copy & paste in to the appropriate media (LINK tab), or by using the cloud service to distribute the link by email to the recipients you enter (E-MAIL tab).
Public link (without password):
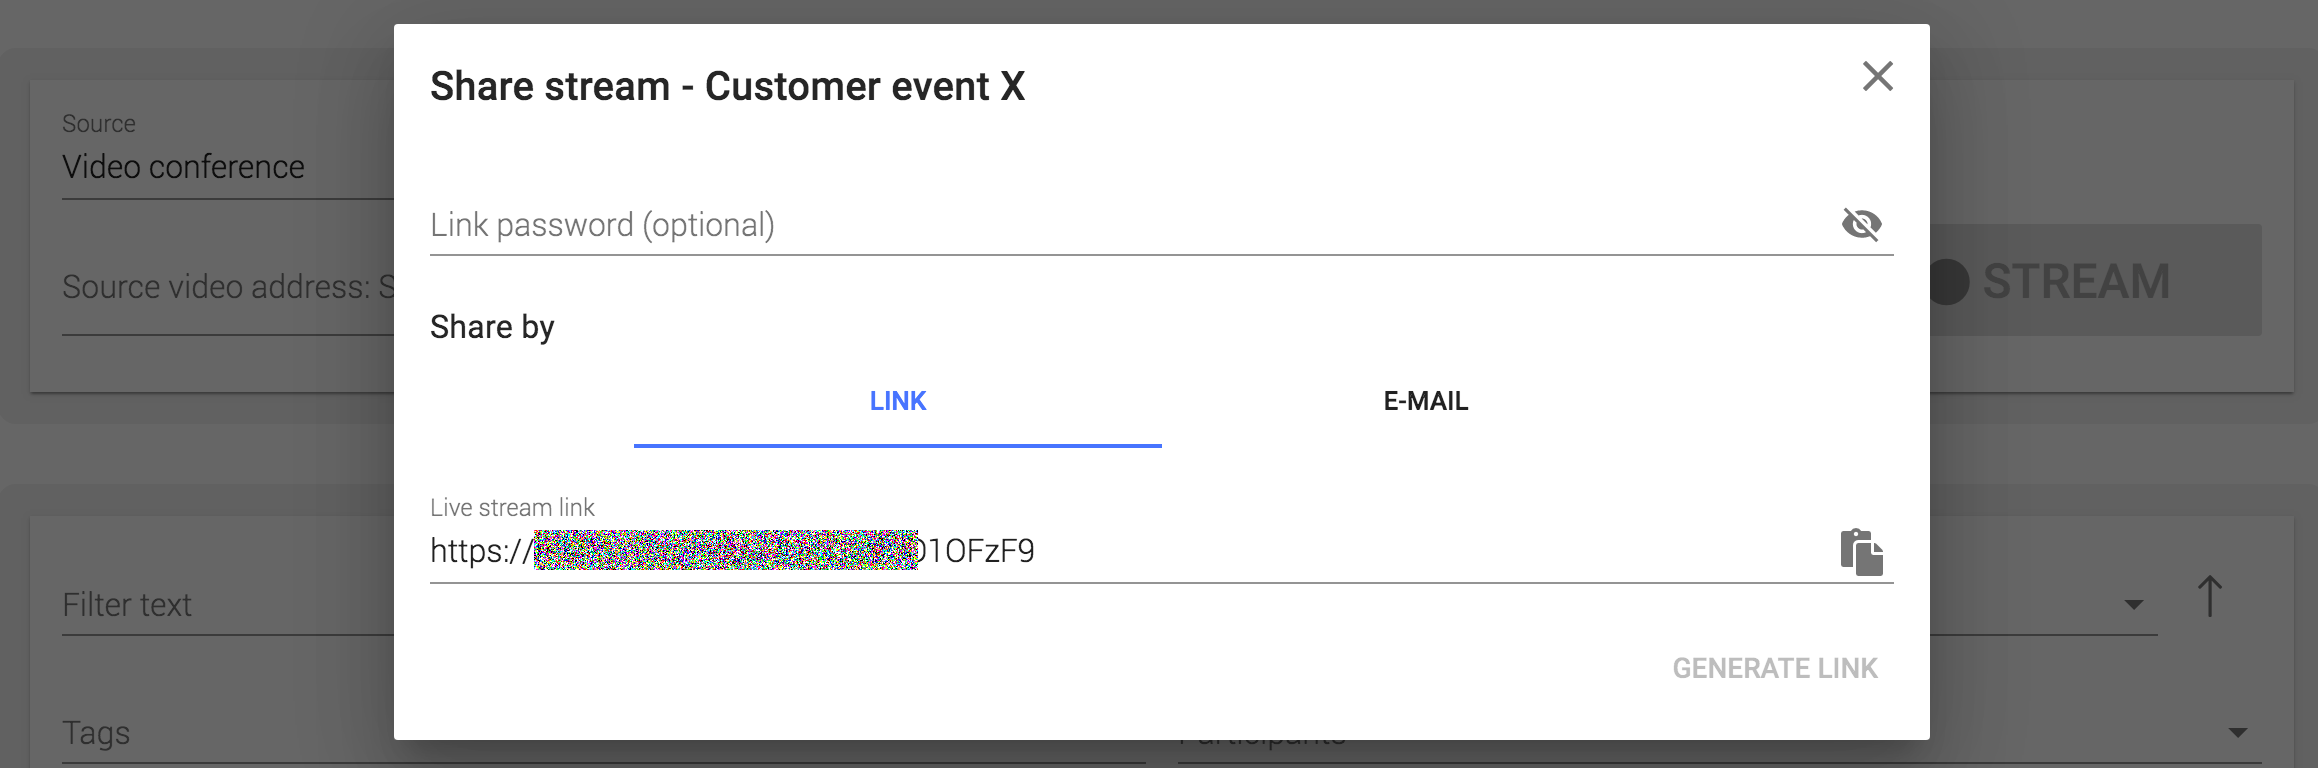
Password protected link:

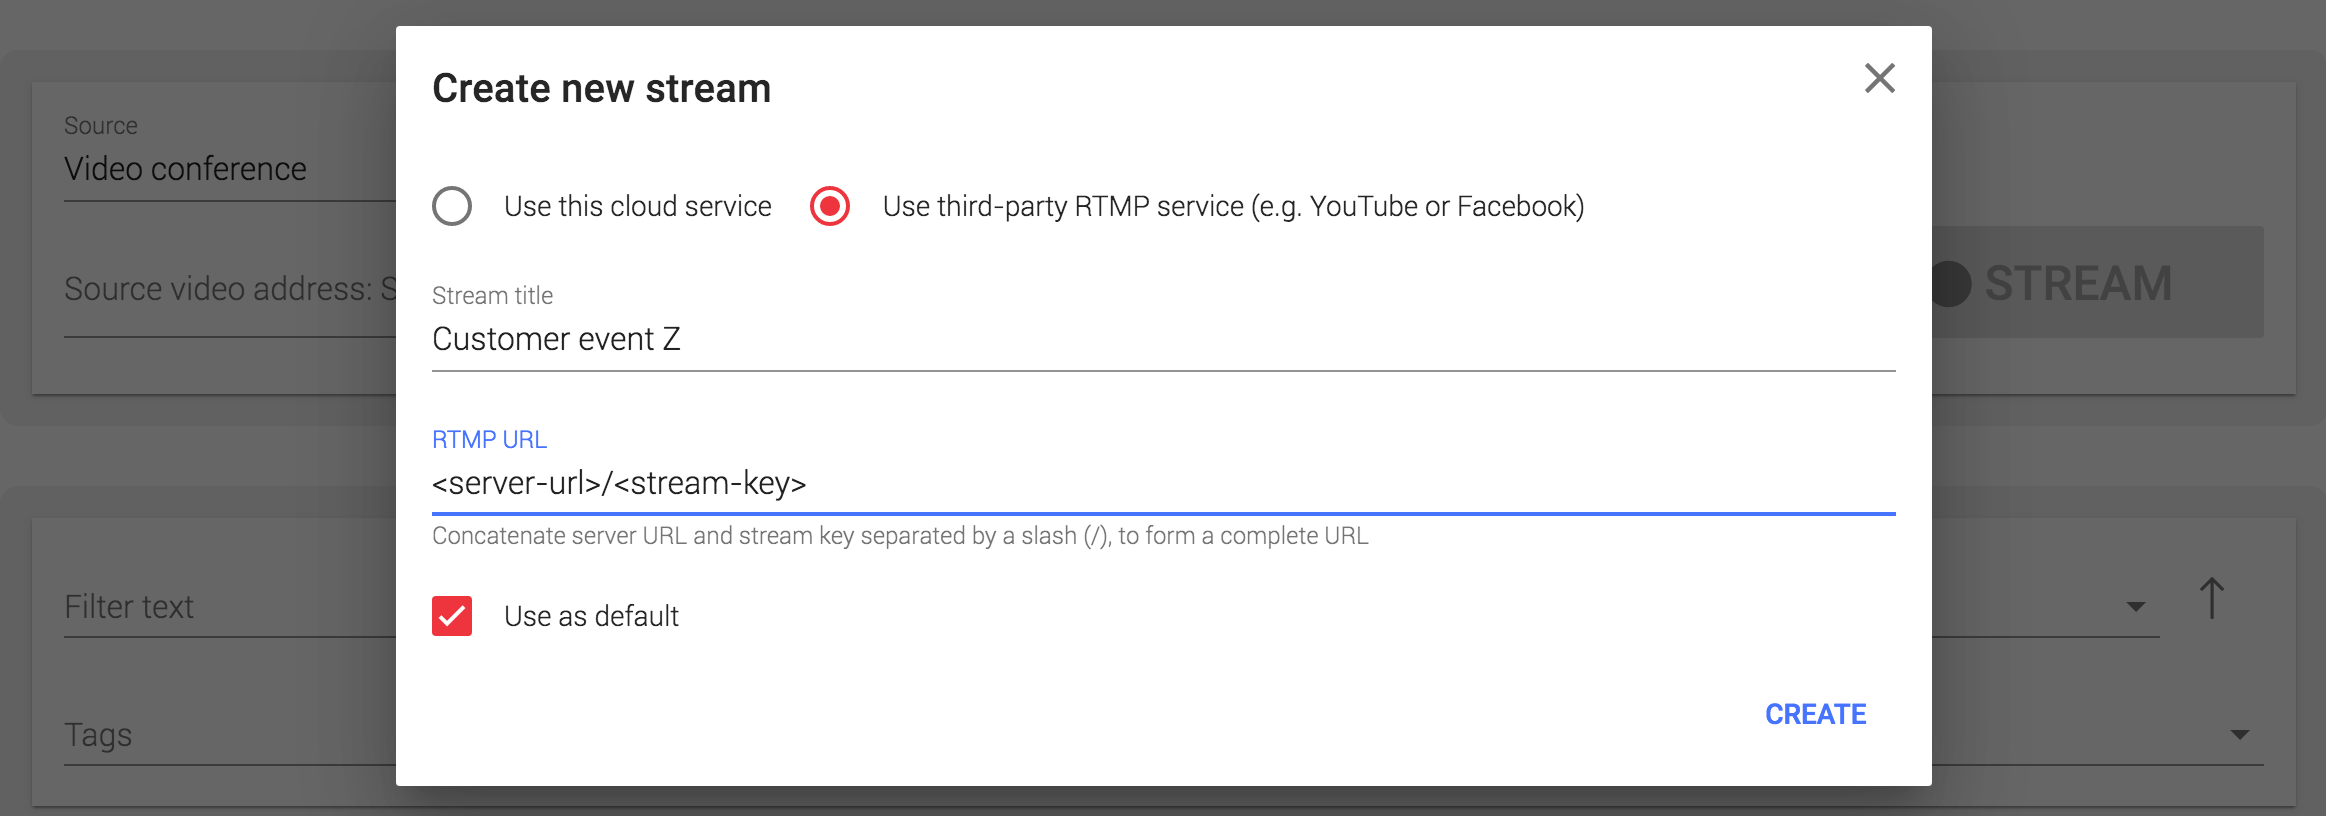
Option 2: Use third-party RTMP service (e.g. YouTube or Facebook)
Select "Use third-party RTMP service (e.g. YouTube or Facebook)" when you want to output an RTMP/RTMPS stream to:
- Social media such as YouTube, Facebook and Periscope
- Any Enterprise CDN and/or video platform accepting RTMP/RTMPS
A complete destination RTMP/RTMPS URL needs to be entered as part of the Stream setup. The RTMP/RTMPS URL is normally configured based on a Server URL and Stream key provided by the third-party RTMP service or platform combined with a slash (/) between:
<server-url>/<stream-key>
YouTube quick guide
Here is a quick guide on how to stream to YouTube.
| 1. | Access your YouTube account |
| 2. |
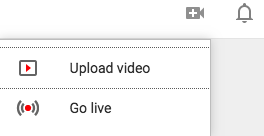 Click on the Camera icon in the top right-hand corner and click thereafter on "Go live".
Note: If you have not done this previosuly, YouTube may take you through some additional steps like filling in details to create a new stream to enabled this feature fully. |
| 3. |
 If you already have a stream set up on YouTube, click the "Manage" tab.
|
| 4. |
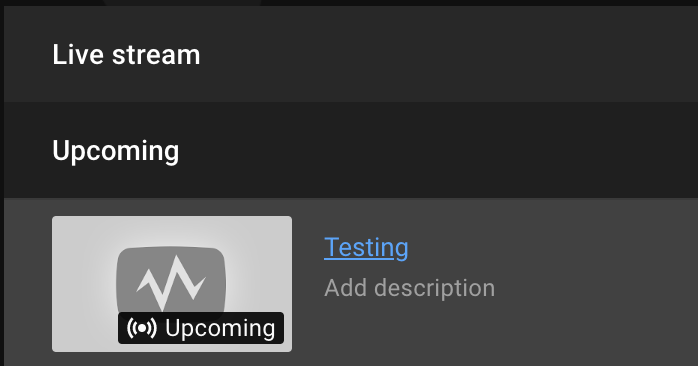 Click on the stream name ("Testing" in this example) of the stream you want to use.
|
| 5. |
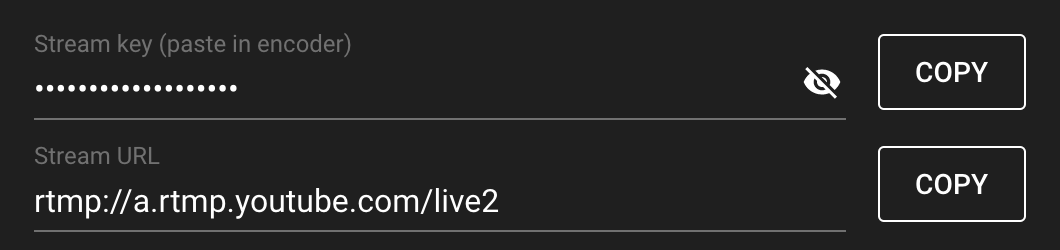 You will then be presented with the Stream URL and the Stream key.
|
| 6. | Combine <server-url>/<stream-key> to get the complete YouTube destination RTMP URL. This is the RMTP URL needed when creating a new Stream as described in the beginning of this chapter. |
| 7. |
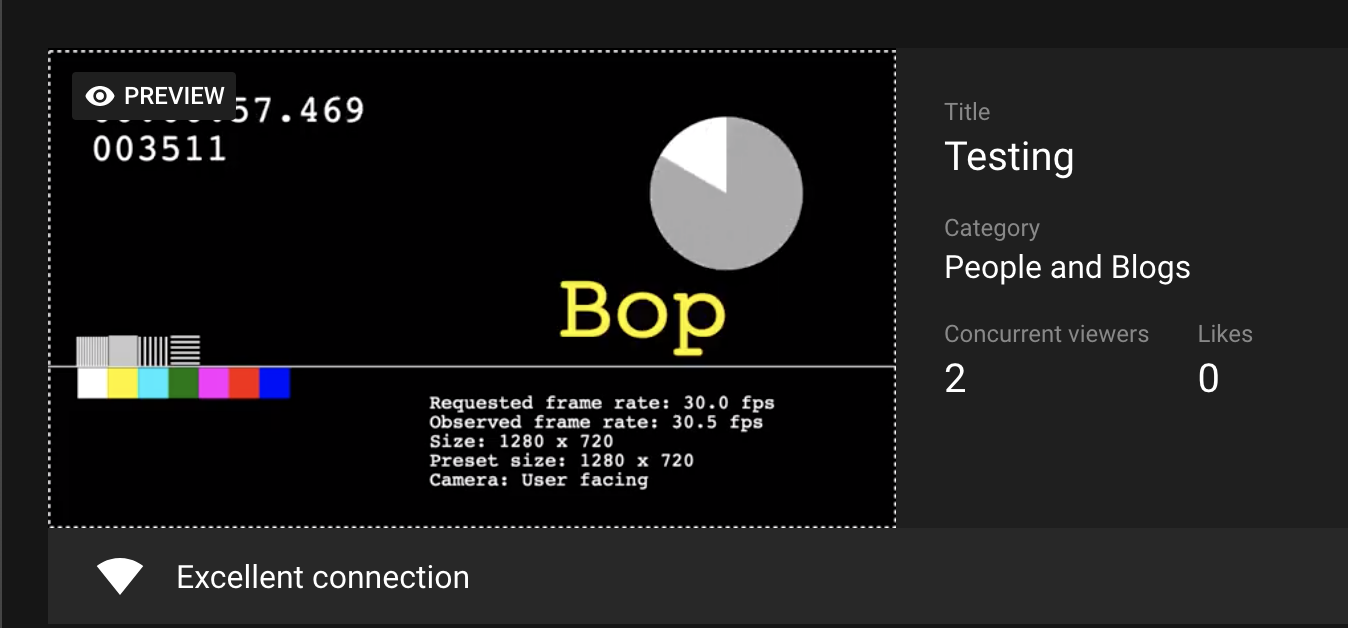 At the time of the live stream, simply establish start the call between the cloud service and the remote source (e.g. videoconferencing endpoint, client or VMR), either by calling to or from the cloud service. The YouTube stream will shortly thereafter automatically start and you will be able to see the following LIVE confirmation inside your YouTube account:
|
Facebook / Workplace quick guide
Here is a quick guide on how to stream to Facebook and Workplace. Please note that Facebook/Workplace from May 1st, 2019, only supports use of RTMPS (not RTMP).
| 1. | Access your Facebook account |
| 2. |
 Click on Live Video
|
| 3. |
 Click on Connected (instead of default Camera)
|
| 4. |
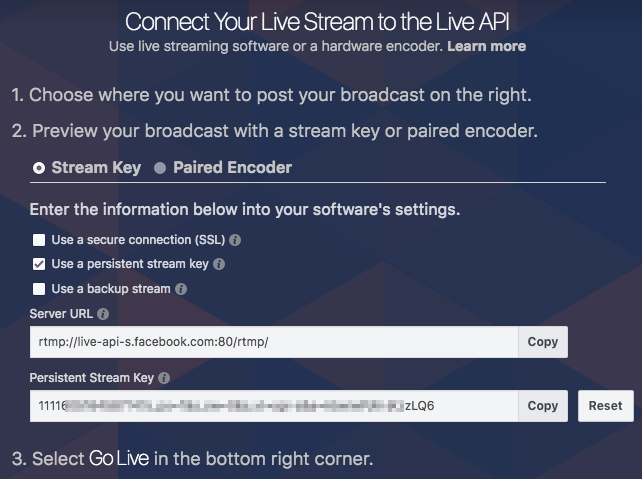 Obtain the Server URL and (Persistent) Stream Key
Note: Selecting "Use a persistent stream key" is great if you want to reuse the Stream setup. |
| 5. | Combine <server-url>/<stream-key> to get the complete Facebook destination RTMPS URL. This is the RMTPS URL needed when creating a new Stream as described in the beginning of this chapter. |
| 6. |
 At the time of the live stream, you will need to go through above steps 1 to 4 before starting the call between the cloud service and the remote source (e.g. videoconferencing endpoint, client or VMR), either by calling to or from the cloud service. The Facebook preview stream will shortly thereafter start and you can then click on the Go Live button to share the stream with your Facebook audience.
|
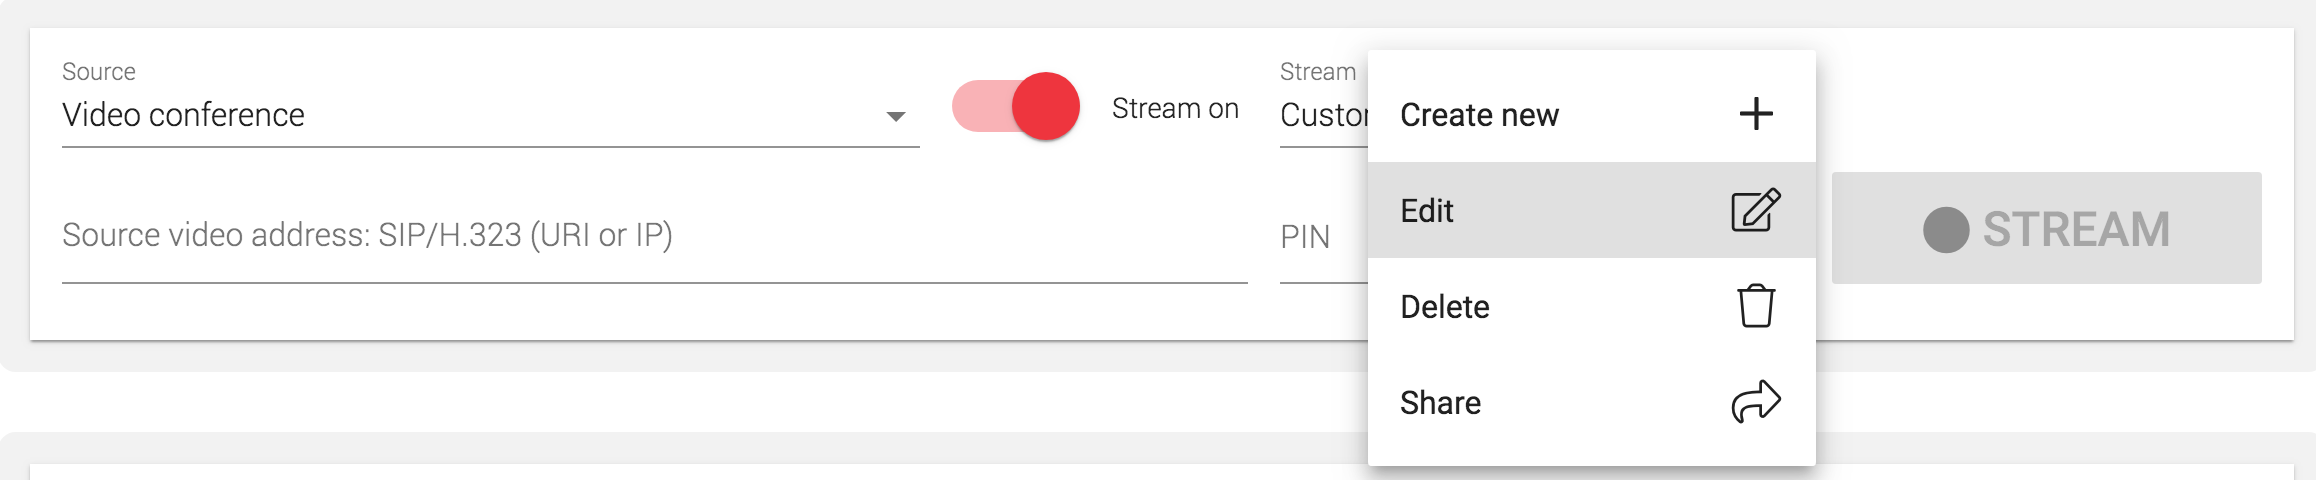
Edit, Delete or Share an existing Stream
To edit, delete or share an existing Stream, select the Stream you want to change from the Stream dropdown and click on the Stream actions menu next to the Stream dropdown:

Thereafter, select Edit, Delete or Share from the Stream actions menu:
Stream & Record with Video conference as Source
Before Streaming & Recording
Do the following before starting to stream & record:
- Set Source to Video conference
- Set Stream to On
- Select Stream from your list of previously created Streams

Starting Streaming & Recording
The streaming & recording can be started in one of the following ways:
- You can call from your video conference endpoint, client or virtual meeting room to your address listed at the top of the Cloud user interface (next to Logout).
- You can call from the Cloud user interface to your video conference endpoint, client or virtual meeting room by (see screenshot below):
- Entering the video address (SIP URI or IP address)
- Entering PIN code (if required by the e.g. virtual meeting room)
- Clicking on the red STREAM button

The Cloud service will connect to your endpoint, client or virtual meeting room as another participant and a black screen with a red blinking dot will transmitted from the Cloud service to the remote side (indicating that the meeting is being streamed & recorded).
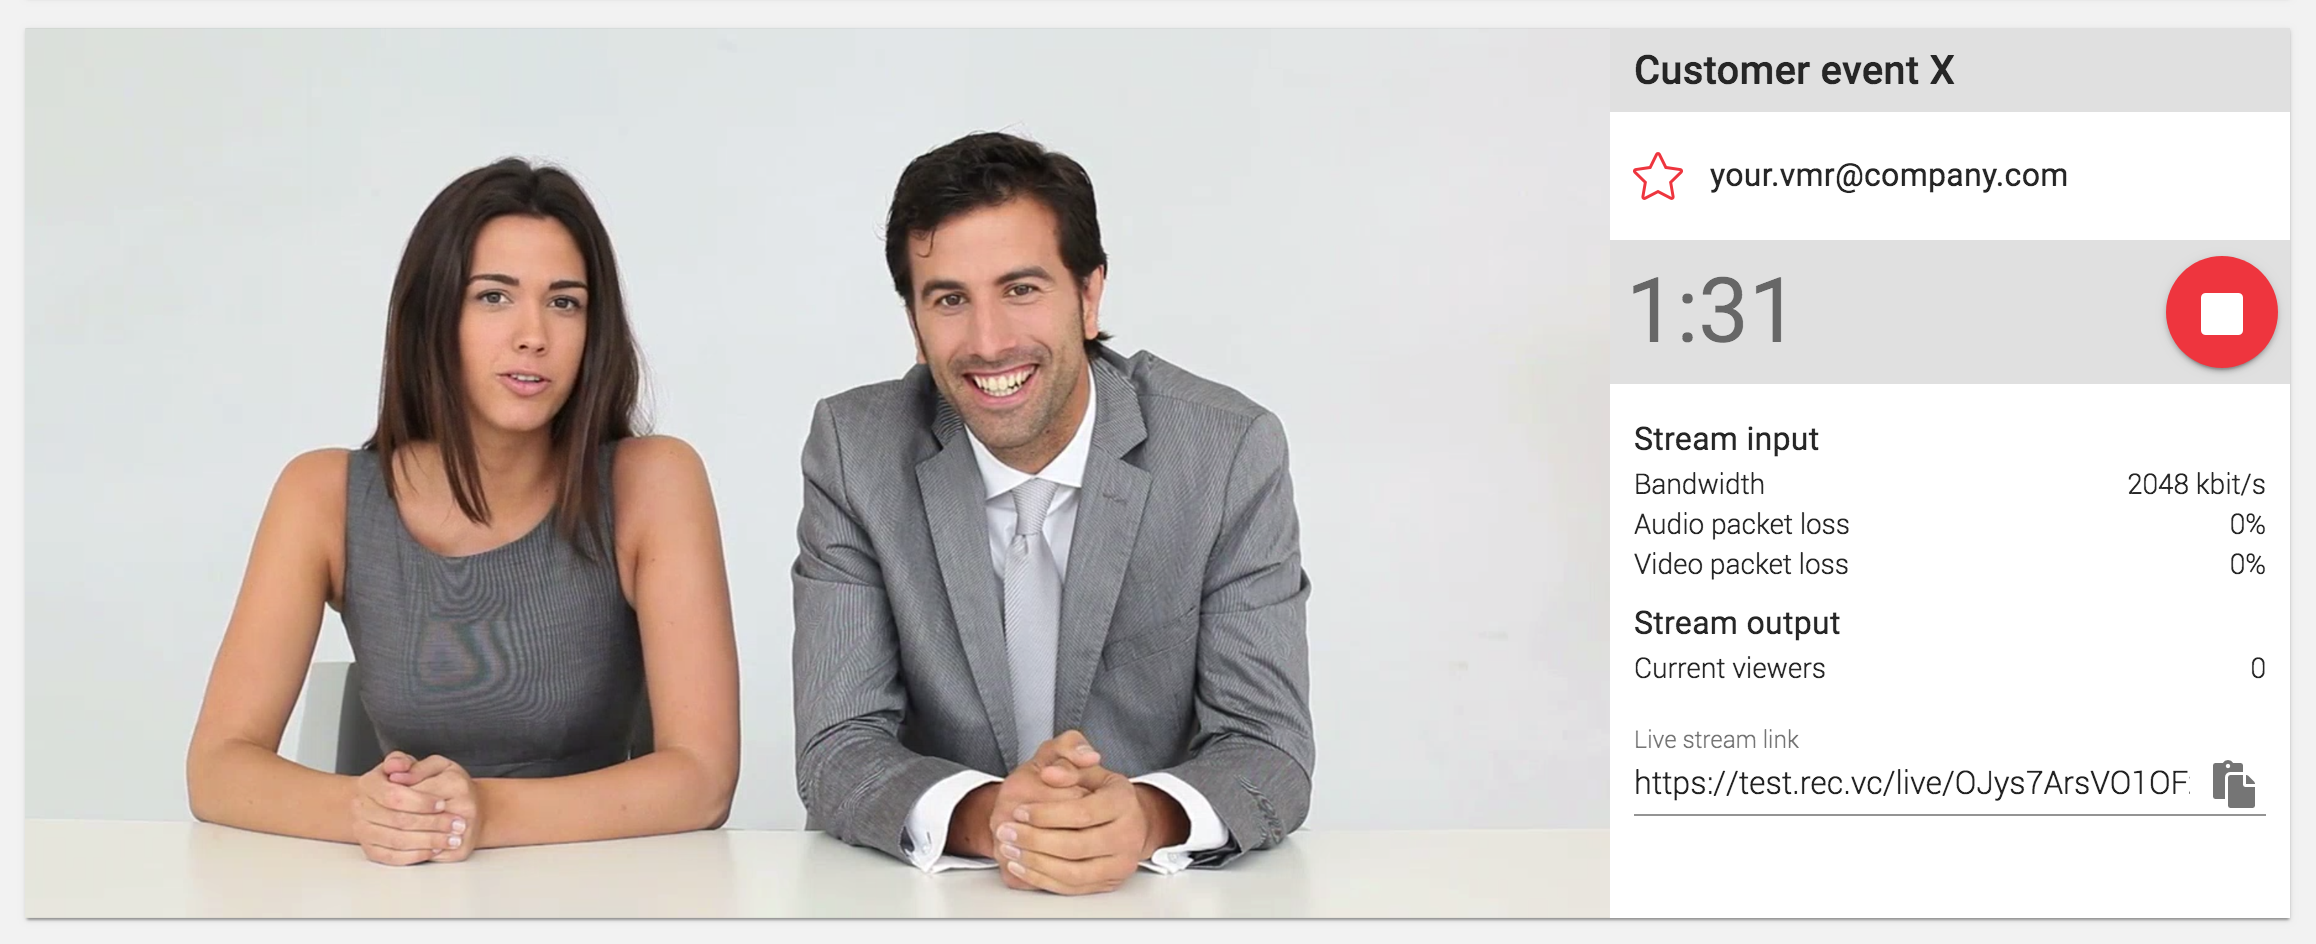
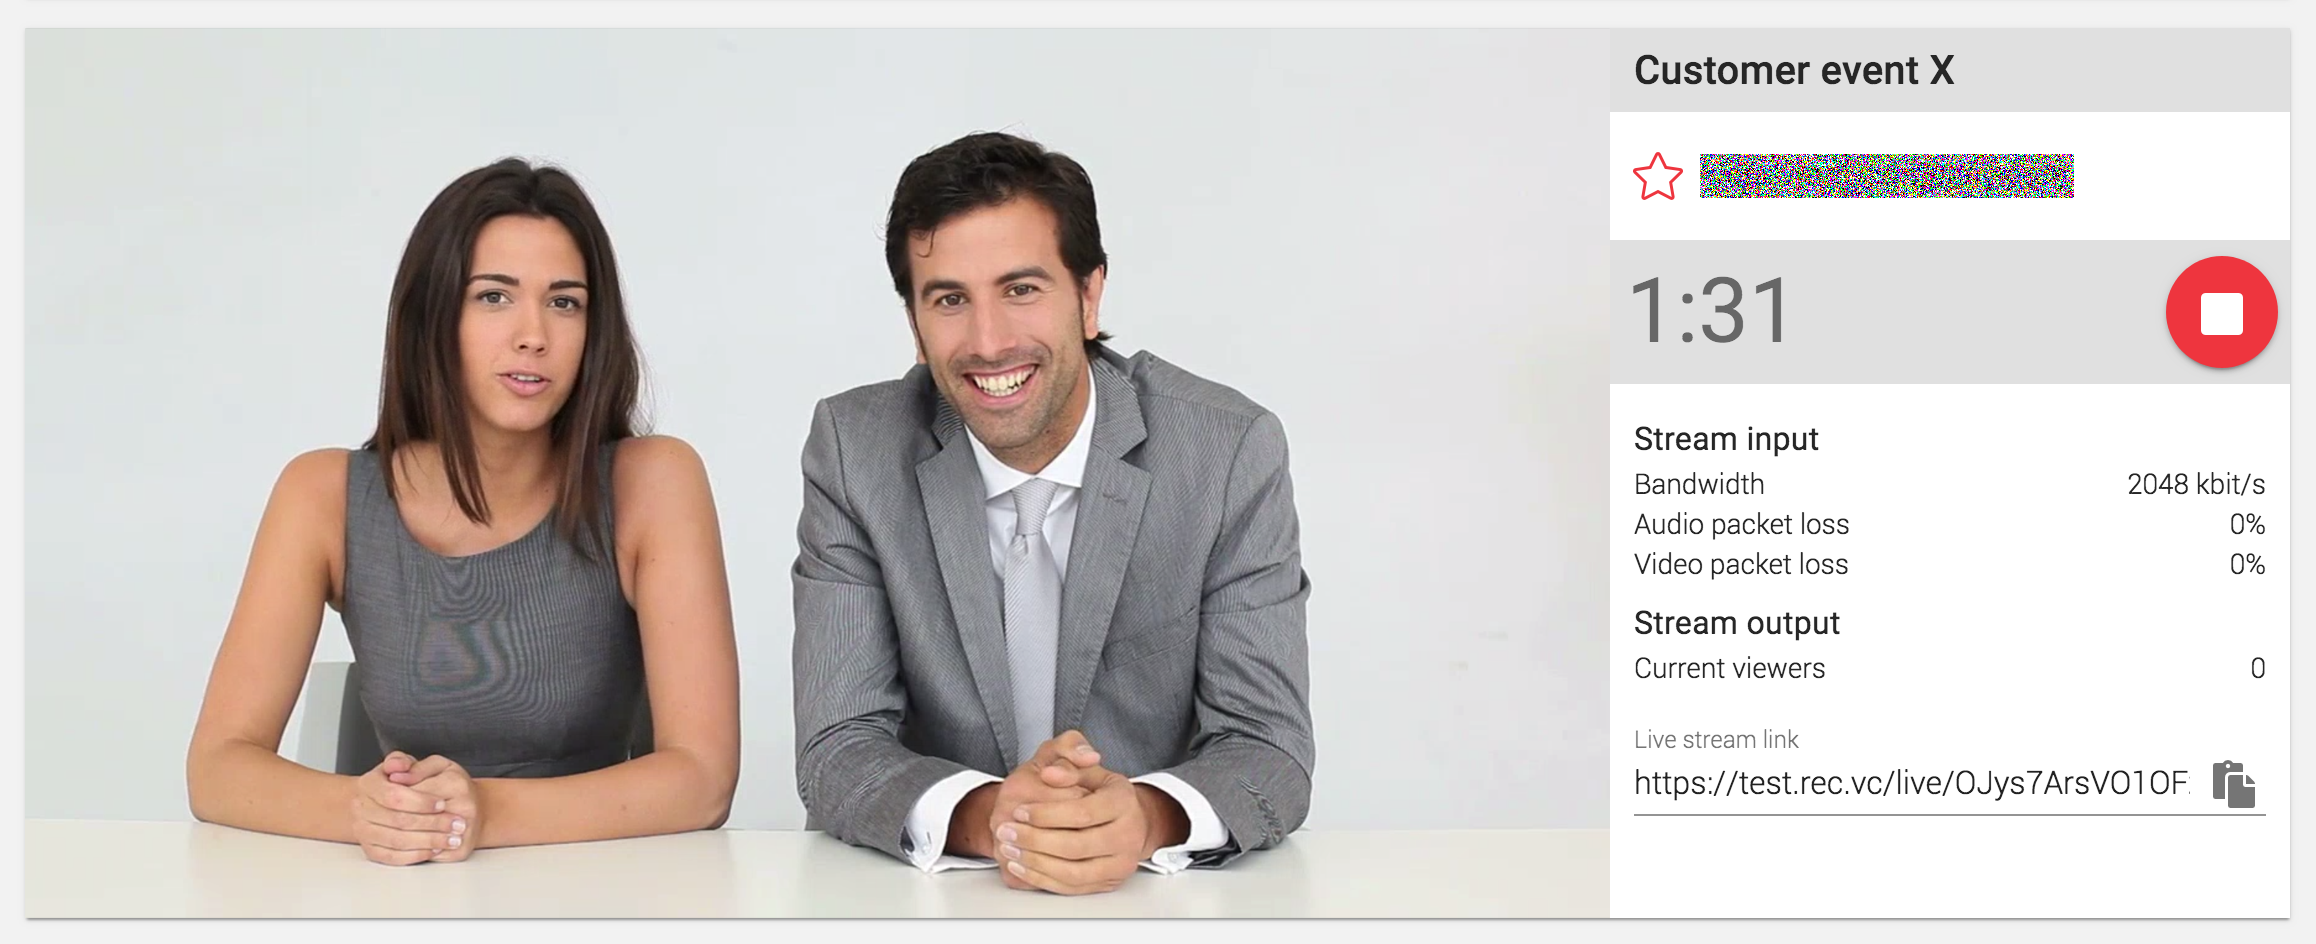
During Streaming & Recording
When the call has successfully been established between the Cloud service and your endpoint, client or virtual meeting room, a Streaming & Recording Session Window will appear in the Cloud user interface with the following:
- A preview of the live stream
- Stream input details:
- Bandwidth
- Audio packet loss
- video packet loss
- Stream output details:
- Current viewers (real-time stats)
Note: The live stream delay can range from 5 to 30 seconds based on a number of factors including viewer's Internet access and device.
If the live stream is to a third-party RTMP service the following will appear in the user interface:
Note: No preview of live stream when streaming to third-party RTMP service.
Stopping Streaming & Recording
To stop the recording, you can either click on the red stop button in the Streaming & Recording Session Window or disconnect the Cloud service as participant on the remote side.
The recorded video will automatically appear in your Video Library.
Stream & Record with Connected camera as Source
Before Streaming & Recording
Do the following:
- Set Source to Connected camera (to use your integrated or USB connected camera)
- Set Stream to On
- Select Stream from your list of previously created Streams
- You may make changes to the following settings available below the red STREAM button:
- Bandwidth
- Audio source
- Video source
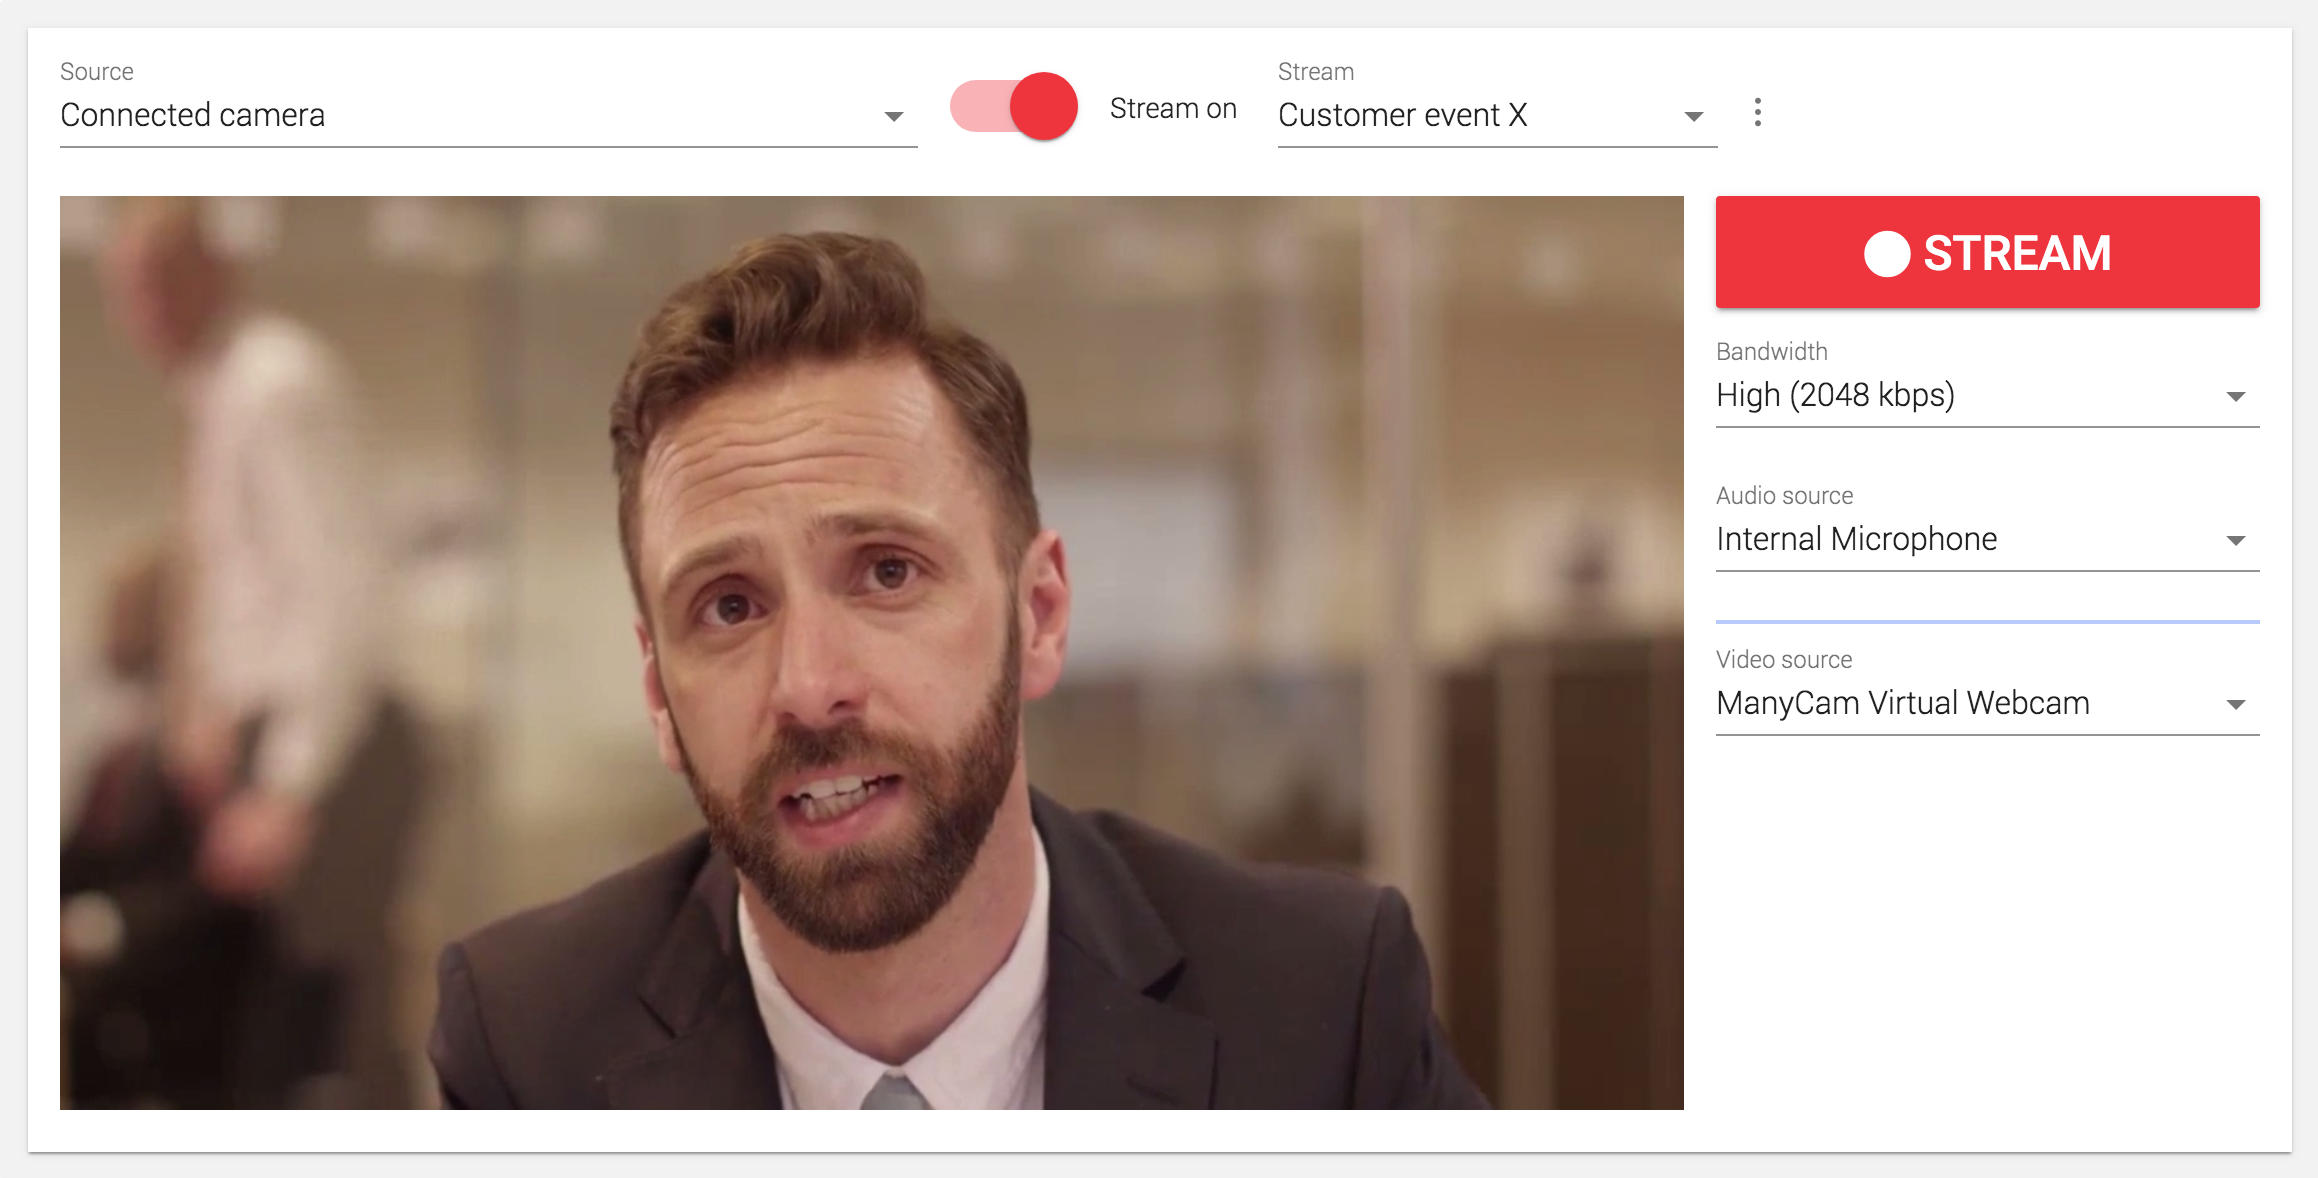
Starting Streaming & Recording
Click on the red STREAM button whenever you are ready to start streaming & recording.
During Streaming & Recording
When the streaming & recording have started a Streaming & Recording Session Window will appear in the Cloud user interface with the following:
- A preview of the video coming from the connected camera
- Stream input details:
- Bandwidth
- Audio packet loss
- video packet loss
- Stream output details:
- Current viewers (real-time stats)
Placed on top of the preview video you have the following buttons which you can use during the streaming & recording session:
- Mute/un-mute audio
- Disable/enable video
- Share screen (will replace the video source whenever active)
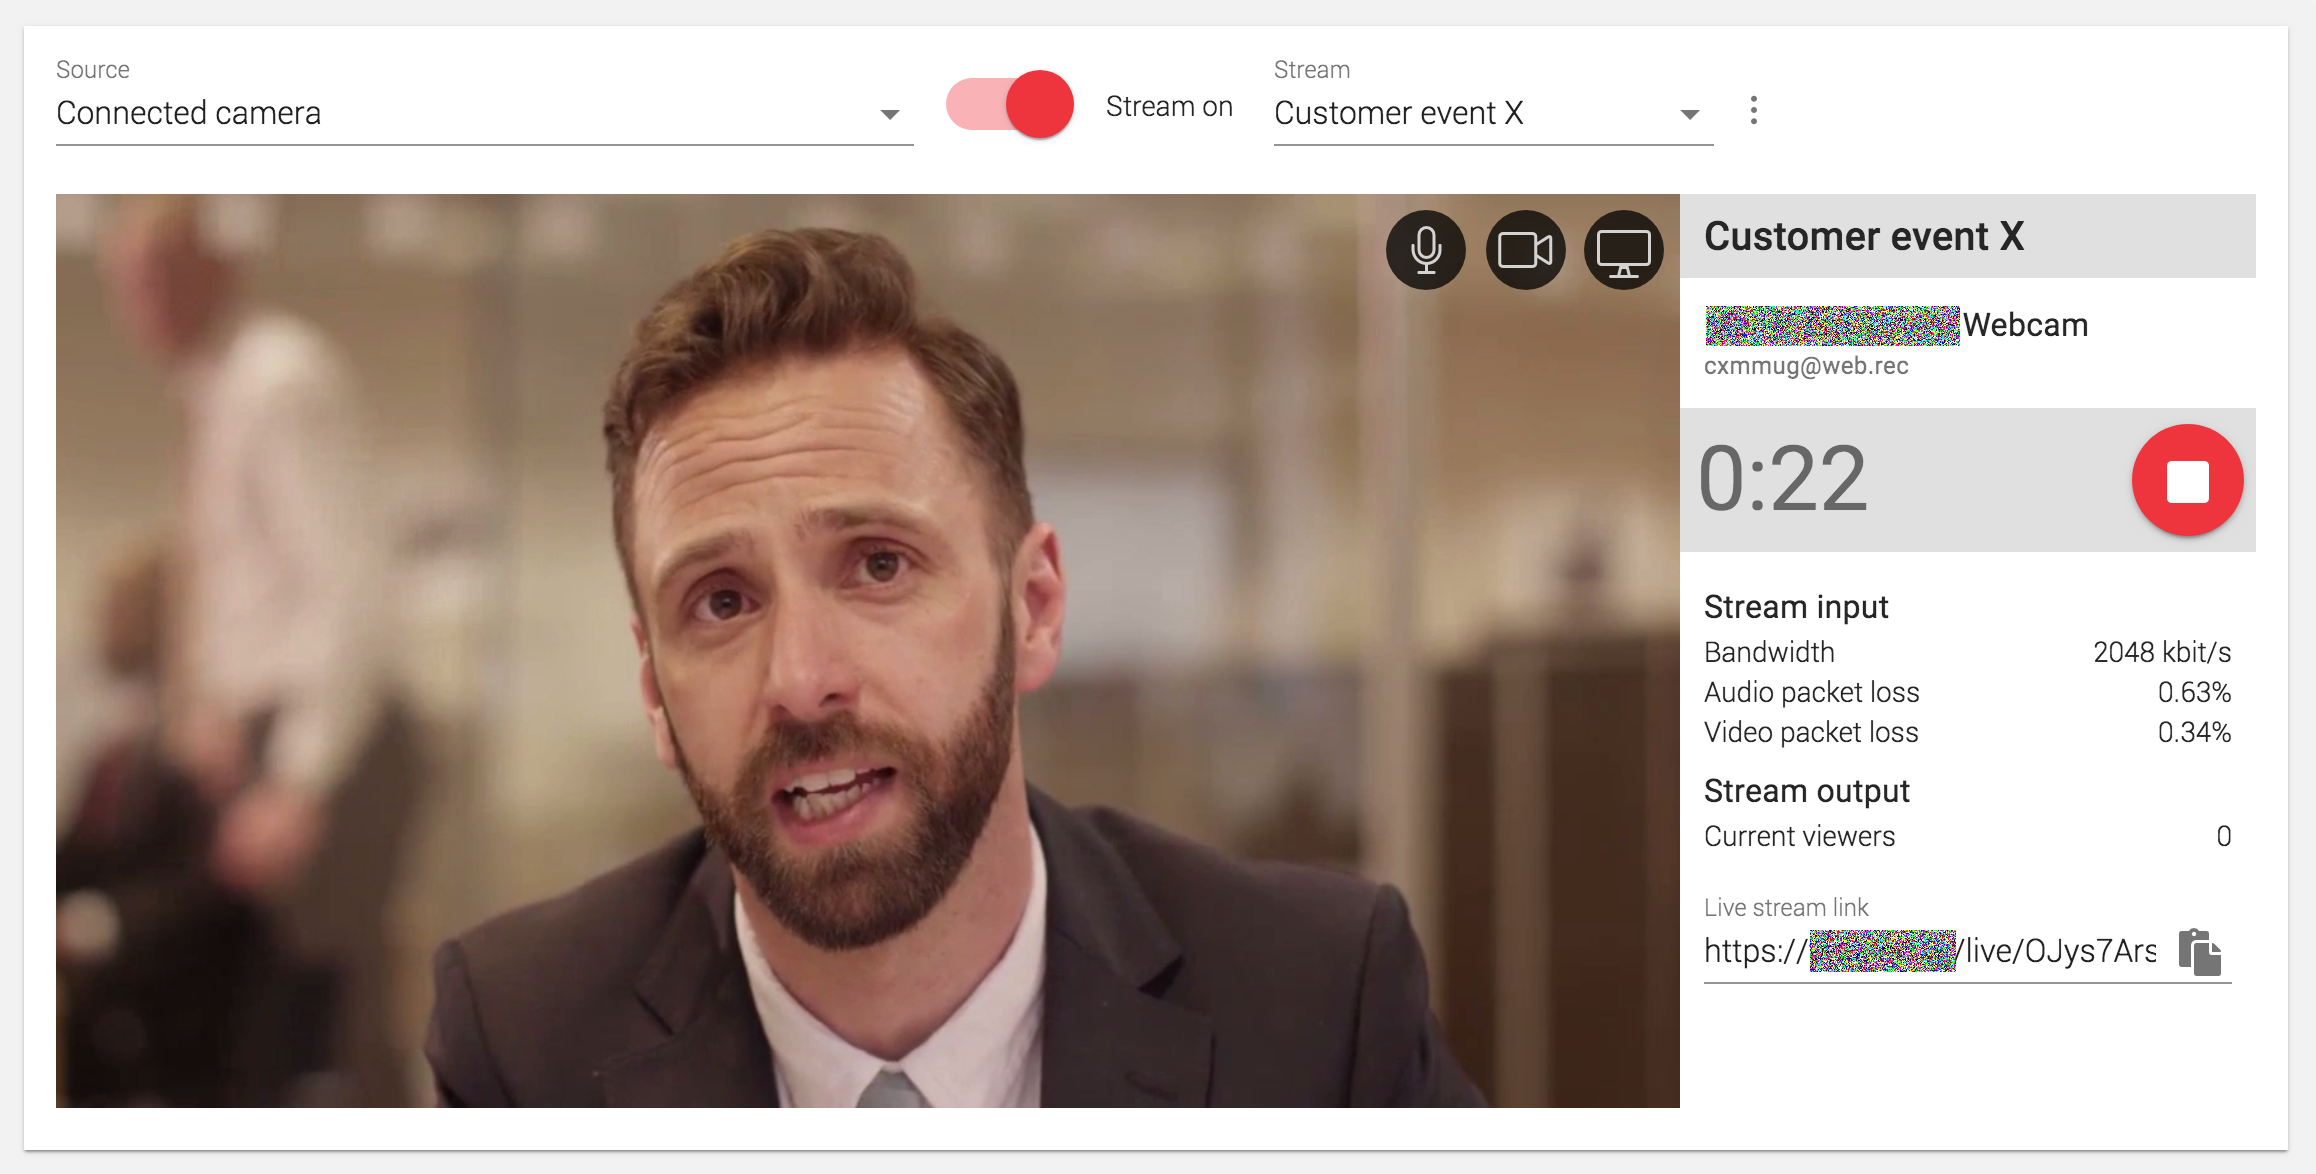
Stopping Streaming & Recording
To stop the streaming & recording, you can simply click on the red stop button in the Streaming & Recording Session Window.
The recorded video will automatically appear in your Video Library.
Stream & Record with Skype for Business as Source
This feature is not available to all customers. In case the Source dropdown does not list Skype for Business, the feature is not available to your organization.
Before Streaming & Recording
The first time you want to stream & record from Skype for Business (SfB) create a new Contact in your SfB client with the video address listed at the top of the Cloud user interface (next to Logout).
Do the following before starting streaming & recording:
- Set Mode to Stream & record
- Select Stream from your list of previously created Streams
Note:
- Changing the Source does not really matter as Skype for Business (SfB) streaming & recording can only be initiated from the SfB client side and that the recording will start regardless of selected Source whenever the Cloud service receives a call from the SfB side.
- Your SfB account needs to be enabled with External Communication in general, or specifically for the Cloud service domain

Starting Streaming & Recording
You can start a streaming & recording from the SfB client in one of the following ways:
- Place a direct video call to:
- Your address listed at the top of the Cloud user interface (next to Logout),
- or the SfB Contact if you have already added this for your address
- Drag & drop the SfB Contact into an ongoing SfB call
The streaming & recording will start as soon as the call has been established between SfB and the Cloud service. This is confirmed by the black screen with a red blinking dot transmitted from the Cloud service side to the SfB meeting.
During Streaming & Recording
When the call has successfully been established between the SfB side and the Cloud service, a Streaming & Recording Session Window will appear in the Cloud user interface with the following:
- A preview of the live stream
- Stream input details:
- Bandwidth
- Audio packet loss
- video packet loss
- Stream output details:
- Current viewers (real-time stats)
Note: The live stream delay can range from 5 to 30 seconds based on a number of factors including viewer's Internet access and device.
If the live stream is to a third-party RTMP service the following will appear in the user interface (note: No preview of live stream when streaming to third-party RTMP service):
Stopping the Streaming & Recording
To stop the streaming & recording, you can either click on the red stop button in the Streaming & Recording Session Window or disconnect the Cloud service as participant on the remote side.
The recorded video will automatically appear in your Video Library.
Cloud Mixing of Video and Content
Cloud mixing can be used when Source is Video conference, and the remote side supports BFCP (separation of video and content).
Cloud mixing is available via the menu in the top right corner in the user interface under Settings.
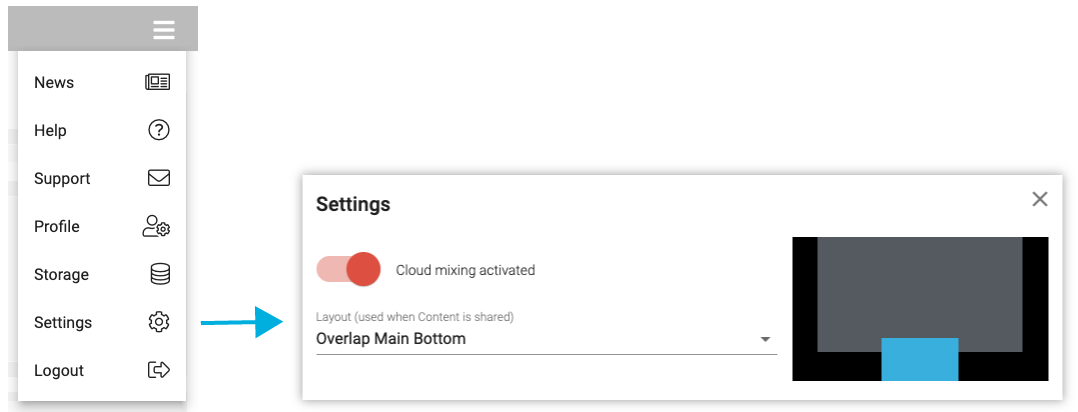
When Cloud mixing is activated, the video (blue) and content (gray) channels will be mixed as shown in the selected Layout when content is present.
When Cloud mixing is deactivated, the mixing will be performed on the remote side.
When updating Settings, it may take up to 60 seconds before the change is activated. Any change will only apply to new sessions and it will not apply to ongoing sessions or existing recordings.
Adding a Video Conference address as Favorite
Whenever a Record or Stream session is in progress you can click on the red star in the Record/Stream Session Window to add the Video Conference address used to your list of Favorite addresses. When clicked, you will be prompted to enter a Name and optionally a PIN code (e.g. if this is a virtual meeting room requiring PIN code authentication). Default delay before the Cloud service sends the PIN code with DTMF to the remote side is 5 seconds but can be adjusted when needed.
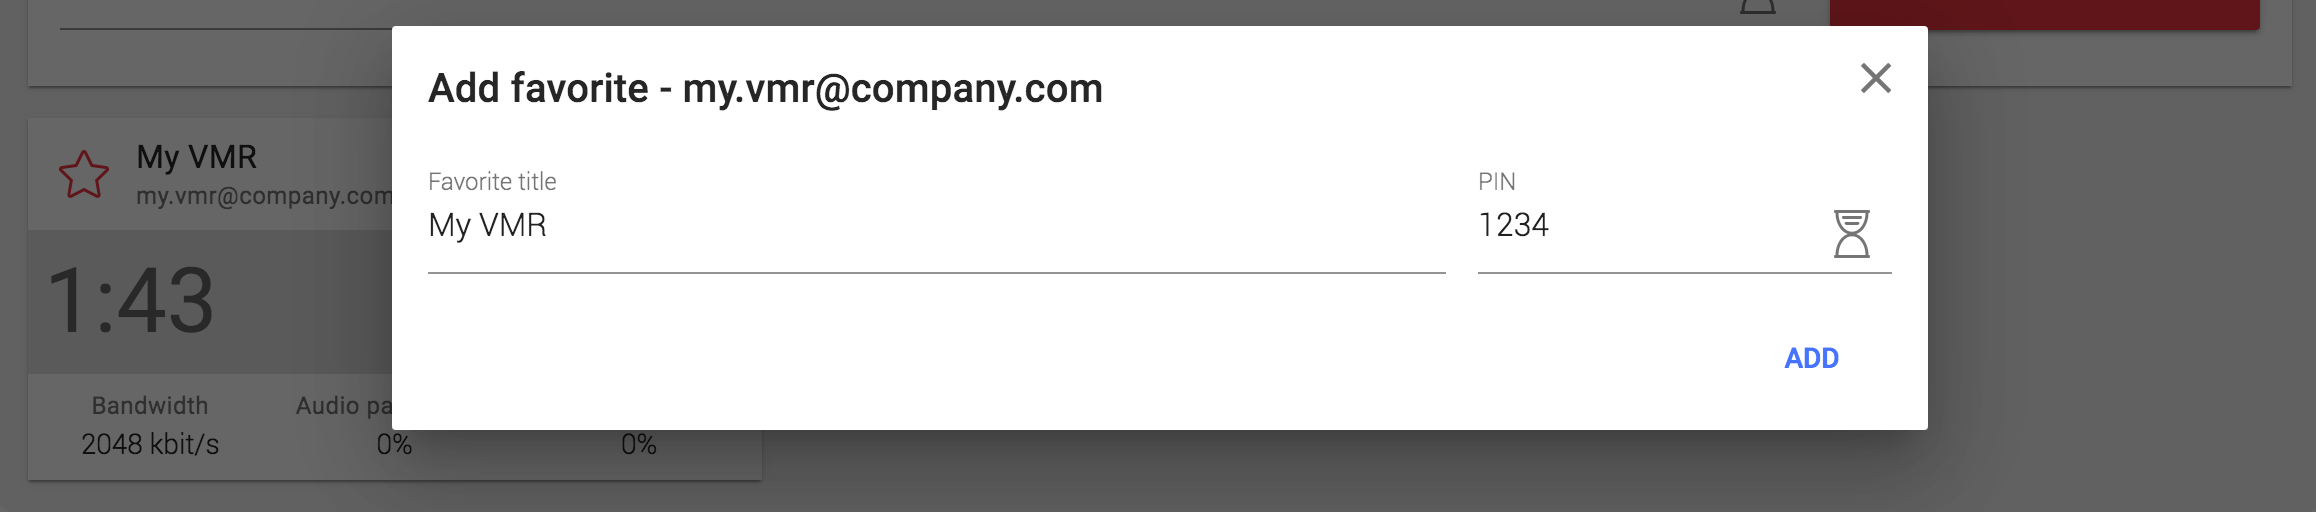
Any favorite addresses added will be displayed as Favorite buttons below the Source video address field. The next time you want to record or stream a Video Conference, all you have to do it to click on the Favorite in question.

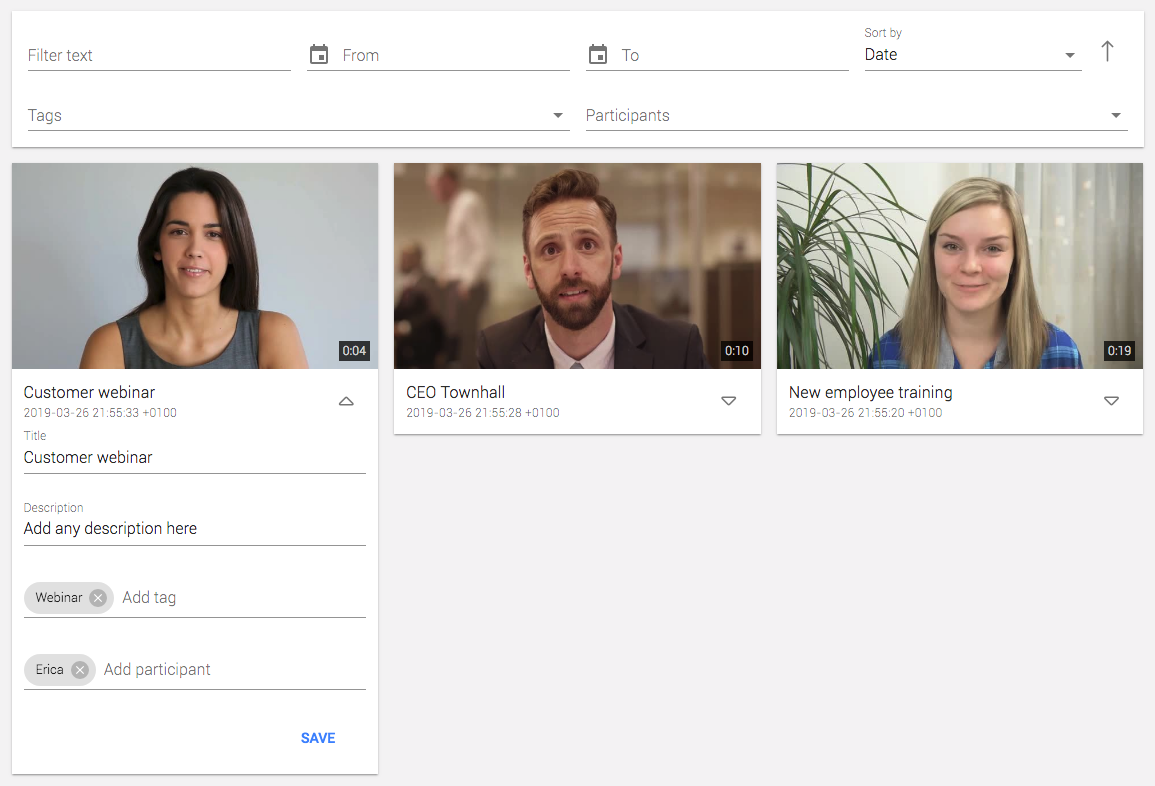
Organize your recordings
You can add the following meta data to enrich, organize and search your recordings:
- Title (e.g. the name of the meeting)
- Tag (e.g. particular meeting topic or type)
- Person (e.g. meeting participants)
- Description
To find a recording you can search by free text and optionally set a data filter based on From / To. You may also filter the search based on Tag(s) and/or Person(s). The recordings can be sorted by Date, Duration and Size.
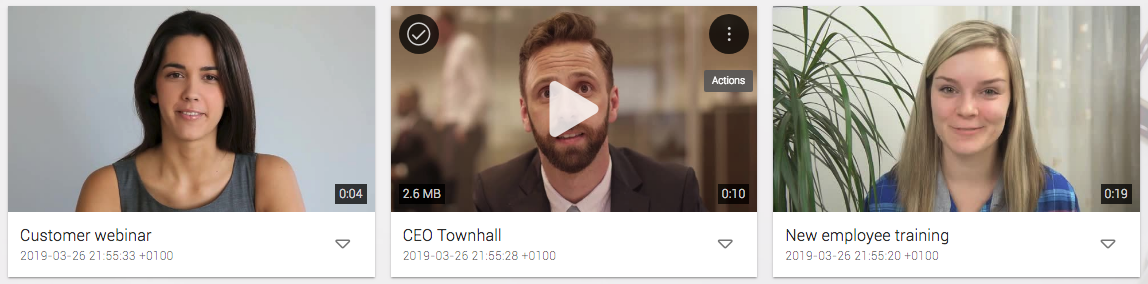
Play, Trim, Share, Download, Delete
You may play any recording directly in the user interface by clicking on the play icon when hovering any video.
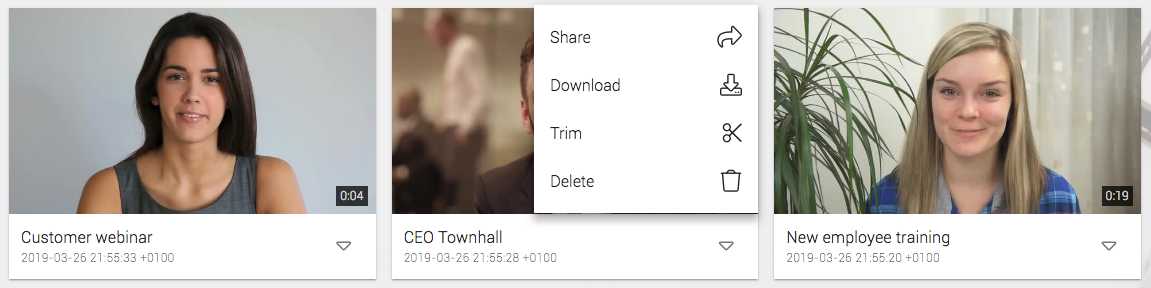
When hovering a video and clicking on the icon in the top right hand corner you get the following options :
- Trim
- Share
- Download
- Delete
Trim recording
When clicking on the Trim icon the video trim editor appears:
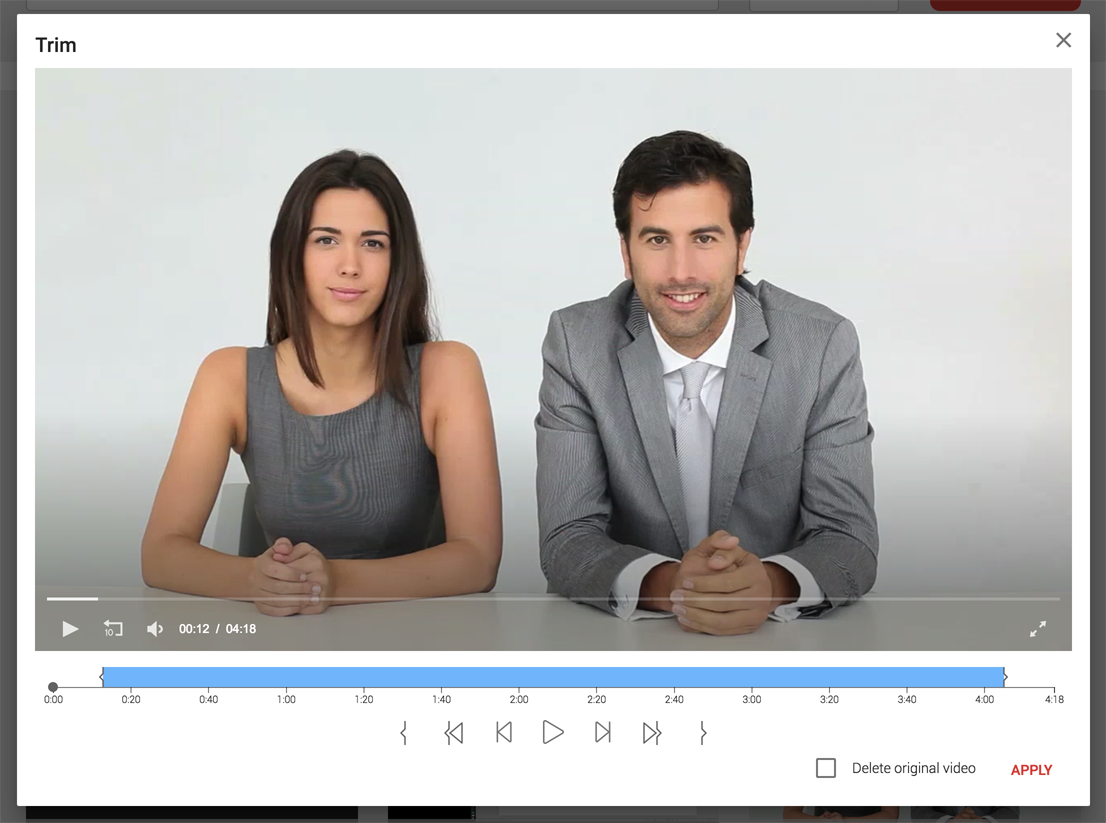
The video trim editor provides a visual interface enabling users to highlight the area of the recording they want to keep (blue) while the remaining areas (white) are to be removed. A new video will be created when the APPLY button is clicked and the original video will be kept unless the user has checked the Delete original video option.
Note: The Trim function becomes available as soon as the post-processing of the recording has been completed. After the recording has been stopped, the post-processing may take from a few seconds to several minutes depending on the duration and file size of the recording.Share recording
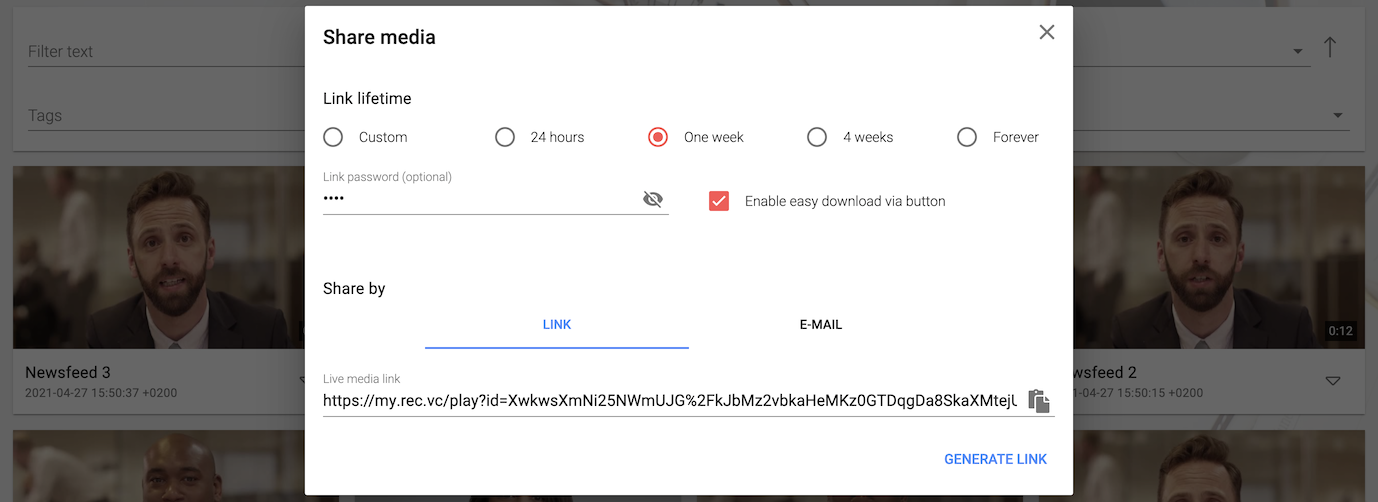
To allow third-party non-users of the cloud service to access a recording, hover the recording and click on the Share icon. This will trigger a Share media window to appear with the following options:
- Link lifetime:
- Custom (set expiry date, the link expires at 23:59:59 (or 11.59.59 pm) of the selected date (based on User's own timezone (note: not the viewer's timezone)))
- 24 hours (the link lasts for exactly 24 hours from the point when the GENERATE LINK button is clicked)
- One week (the link lasts for exactly 168 hours (7 days X 24 hours) from the point when the GENERATE LINK button is clicked)
- 4 weeks (the link lasts for exactly 672 hours (28 days X 24 hours) from the point when the GENERATE LINK button is clicked)
- Forever
- Link password (optional)
- Enable easy download via button (includes download button in video player)
- Share by LINK (copy & paste) or by E-MAIL (add recipients)
You may create any number of share links for a recording, e.g. with different lifetime and password. The lifetime and password of a link cannot be changed after the link has been generated.
Delete recording(s)
You may delete one recording by clicking on the Delete option and confirming the deletion in the next step. This will permanently delete the recording in question.

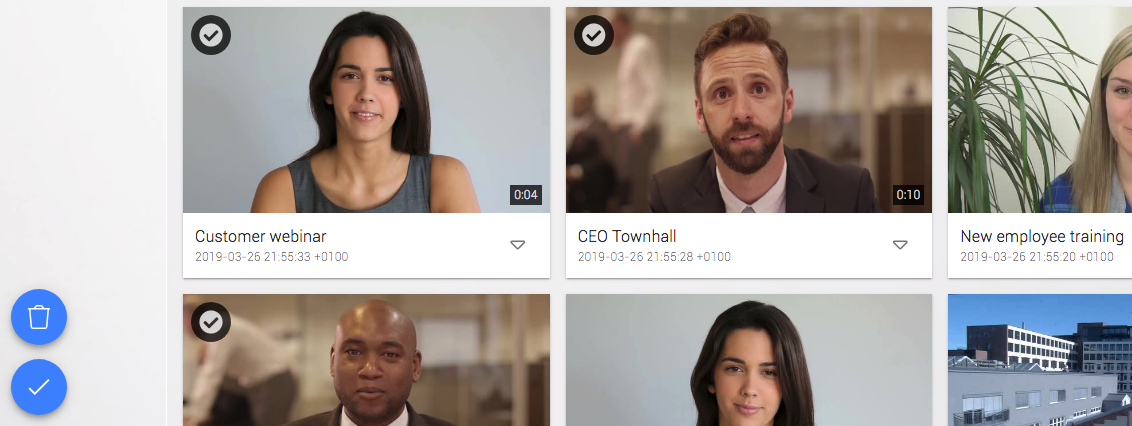
You may delete multiple recordings at the same time by clicking on the Check icon in the top left hand side of the recordings you want to delete, and confirming the deletions in the next step. This will permanently delete the selected recordings
Forgot Password
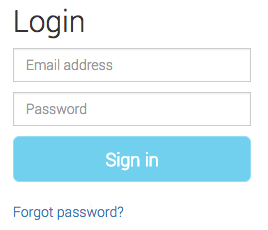
In case you have forgotten your password or you simply want to reset your password, you can reset the password by signing out of the Cloud service and by clicking on the "Forgot Password?" link below the Sign In button, and follow the instructions provided to obtain a password reset link via email.
Reset Password
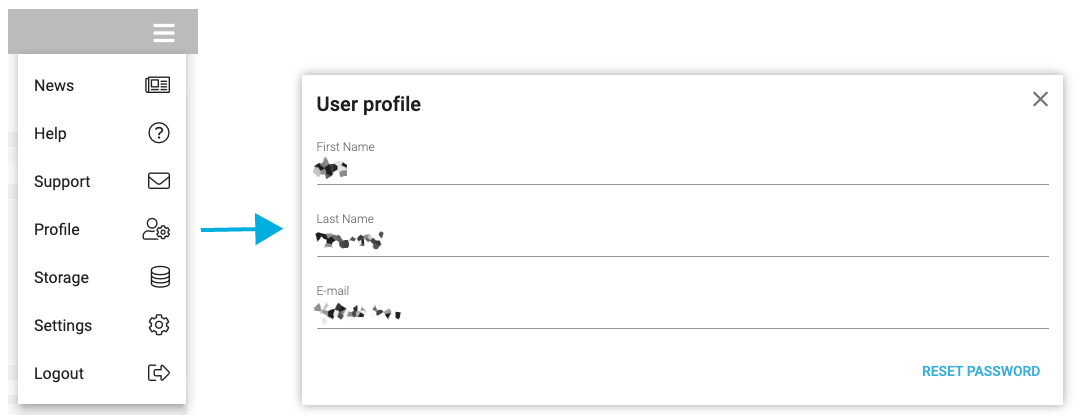
Inside the user inteface you can change the password via the menu in the top right corner under Profile. Click on the RESET PASSWORD button to receive an email with the password reset link.
API
Note: This section is intended for programmers that want to develop integrations with the cloud service.The cloud service is an API first cloud service which means that any functionality in the user interface also is available as API functions which you may leverage to program/develop various integrations and automated workflow tasks.
The API documentation including sandbox for testing is available here.
You may leverage your existing user credentials when working with the API at a User and Recorder level. To get access provisioning functionality and more admin functionality, contact your cloud service provider to get admin permission.
The API supports two kind of authentication mechanisms. If you use standard clients like CURL, HTTP Digest Authentication is the easiest approach. Alternatively, the API supports a token based auth mechanism, where you use your credentials to obtain a token which is used in subsequent requests. The token has a lifetime of 12 hours.